


In our FAQ under “Can my child come on the tour with me?”, we list a few ways to transport a child on a bicycle: A child’s seat, a trailer, a cargo bike, a tagalong or a tandem bike. I was part of writing that text a few years ago before I or anyone else present had any idea about children, let alone how to travel with them.
Now I want to biketour for the first time with my now 2 years old child and join the Biketour for the Childish Weeks. With my own experience and hearing from other parents while organizing the Childish Weeks, I realized that the biggest challenge was not anything that I had imagined – to carry them on the bike, to keep them entertained, happy and comfortable along the way, to manage the daily distances, or to take care of their needs in the middle of nowhere. Instead it was how to actually get there and back.
With a child on board(/bike), I cannot just cycle hundreds or thousands of kilometers to get there in my own pace. It takes a lot of time to care for the child, and they will get bored and uncomfortable if the ride takes too long. Depending on the age, they might also start to miss their peers and not want to be away from home for several months. This means I have to get there relatively fast. Taking long-distance buses is not an option – not only is it an awful experience for the child to sit there for hours without being able to move around freely, which they would express in a loud way that would stress out everyone on board, but for children under 3 you need to bring your own car seat, and what to do with that after arriving at the tour? So taking the train is the only real option.
Imagine travelling by train with a bicycle, luggage, a child and a trailer. At each interchange you need to detach the trailer from the bicycle to fit onto the lift or to carry it down and then up the stairs to the new platform. The whole time you need to hold the child, as they can already run away but are not yet aware of the dangers, and you cannot leave them seated in the trailer, as seeing you leave would be a hurtful experience for them. After making it to the new platform, you don’t know where the bike compartment of the train will arrive, so you have to attach the trailer to the bike again so that you can roll everything to the right door when the train has arrived. There, you have to detach the trailer again to fit through the door, and if it’s one of those trains with a narrow door and steep stairs to get inside, you even have to take off all your luggage and fold the trailer. All this while holding your child and in the one minute that the train is scheduled to stay there. An extremely stressful experience that is only manageable if you are at least 2 or 3 adults or if the child is already old enough to help with the process and to be aware of the dangers.
Because I am preparing to travel to/from the Biketour alone with my child, I have invested some time to find a way to carry my child on the bike. This way I could travel without a trailer, so at least if there are elevators at the stations and they actually work and they are big enough to fit a bicycle, and if the trains happen to have wide doors and an entrance without stairs, I will manage.
The different child seat options
A very common child seat by Römer. The foot rest occupies a lot of space, and the attachment is relatively wide.
There are many types of child seats to go on or above the rack, but they all have the problem that no luggage will fit there because the foot support of the seat is in the way. Travelling with a child I will have even more luggage than usual, so I needed to find a way to fit panniers and a child seat in the back. Geometrically, there are 3 ways to solve this.
Option 1: Put the child seat very high so that the luggage fits on the rack. The only way to achieve this with any of the seats that I could find would be to get a seat that is normally attached to the seat tube of the frame with a long arm, but attach it to the seat post instead. Of the child seats that I know, this would only be possible with the ones from Thule/Yepp, because the attachment of the other brands is so wide that they would be in the way of your legs while pedaling. But even on my bike where the seat post is extended almost to the maximum because I’m quite tall, there is not enough clearance for the Thule attachment. Also, it is explicitly forbidden to do so because the seat post is not designed for such loads, so I wouldn’t even dare it if it fits.
Option 2: Extend the rack backwards and hang the panniers behind the child seat. Even if I would move the seat the furthest to the front that it allows, I would have to extend the rack so far back that the entirety of the panniers would be behind the back axle, creating a significant risk that the bike will flip over backwards on steep climbs or when parked. I wouldn’t even dare to to this if I was on my own, and definitely not when I have a small child on the bike.
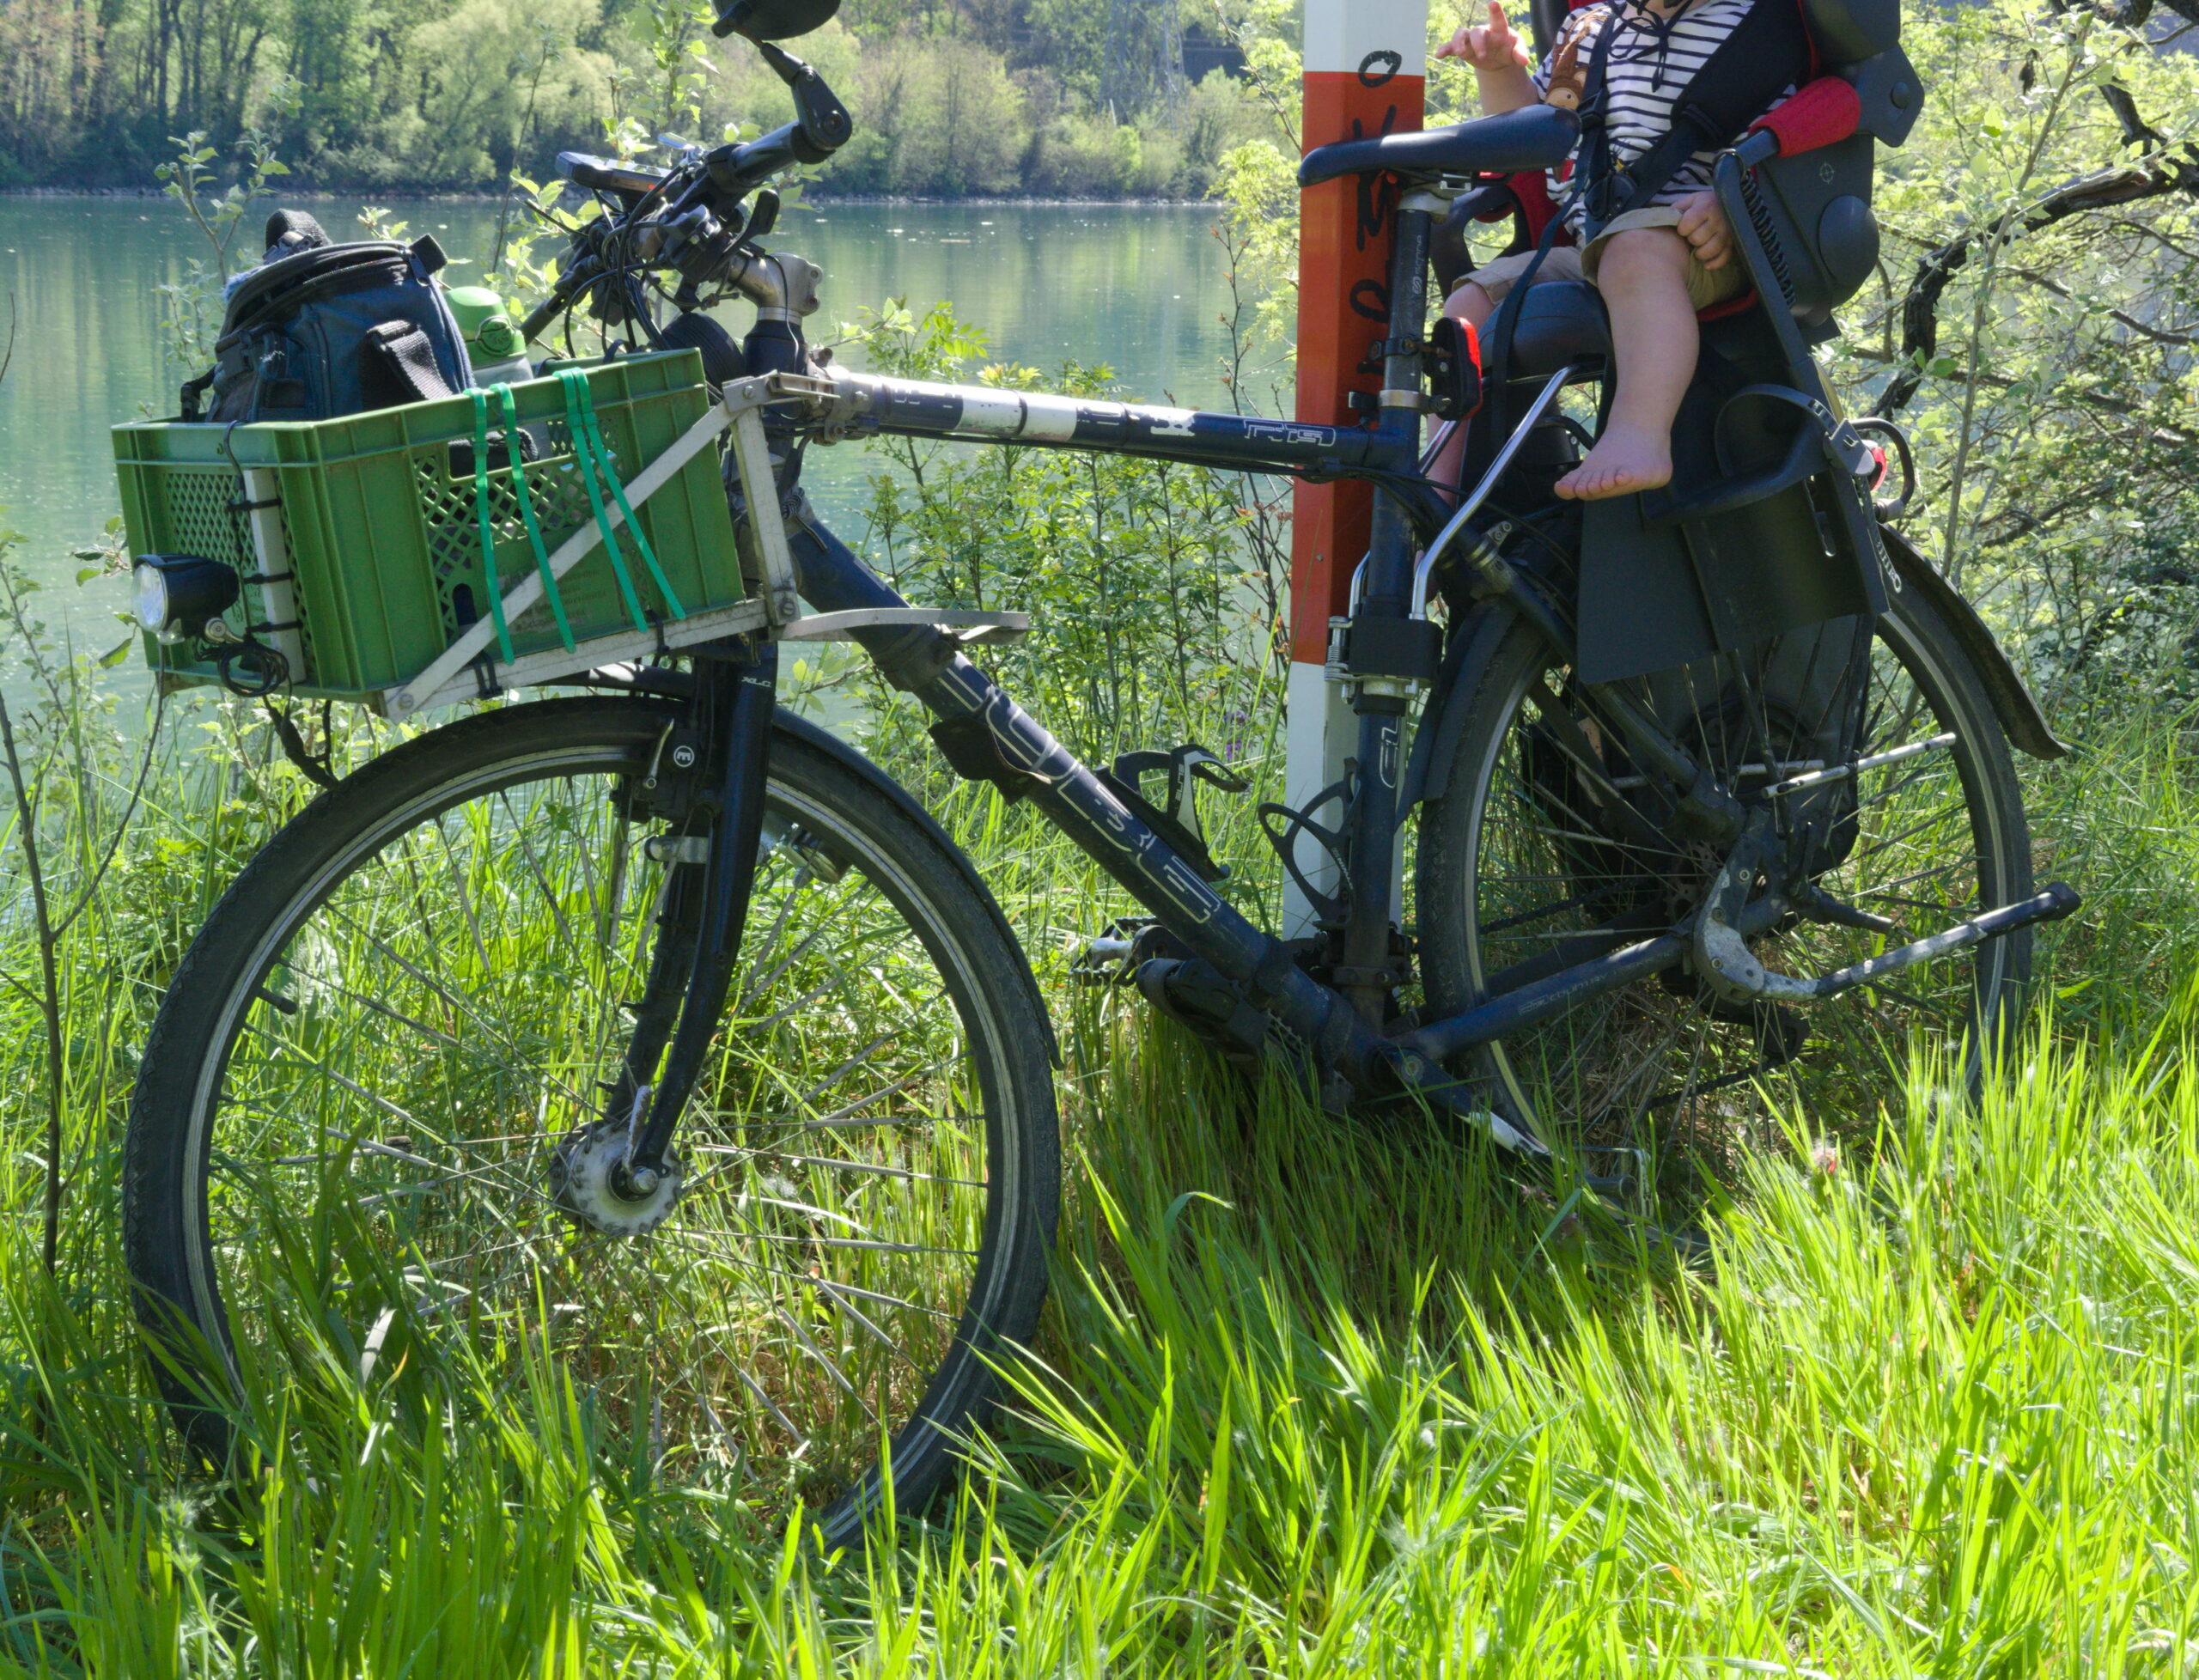
Option 3: Extend the rack downloads and hang the panniers under the seat. I decided to go for this option. To not have to hang the panniers so low that they would touch the ground in steep turns, I still tried to install the child seat as high as possible. This definitely only works with those seats that are attached to the frame (not directly to the rack). And of those I again found that the Thule/Yepp was the most suitable one, firstly because the attachment of the other systems is so wide that there is a limit how high you can put it on the frame before it starts to be in the way of your legs, and secondly because the foot rest of the Thule seems occupy comparatively little space. The latest model is called Thule Yepp 2, but I found that the older model called Thule Yepp (or just Yepp before it was actually taken over by Thule) seems to have an even smaller foot rest, and it is also cheaper. In Germany, the old Yepp sells for around 40–50 €, which is relatively expensive (the cheapest ones by Römer/Britax sell for 0–20 €). Unfortunately, even with the Thule, my legs touch the attachment while pedaling, but it is only a little bit and I think I can get used to it. One additional benefit of the Thule attachment is that a bottle still fits on the seat tube.
Building the frame
I decided to build a small frame for the panniers on each side and screw it to the rack.
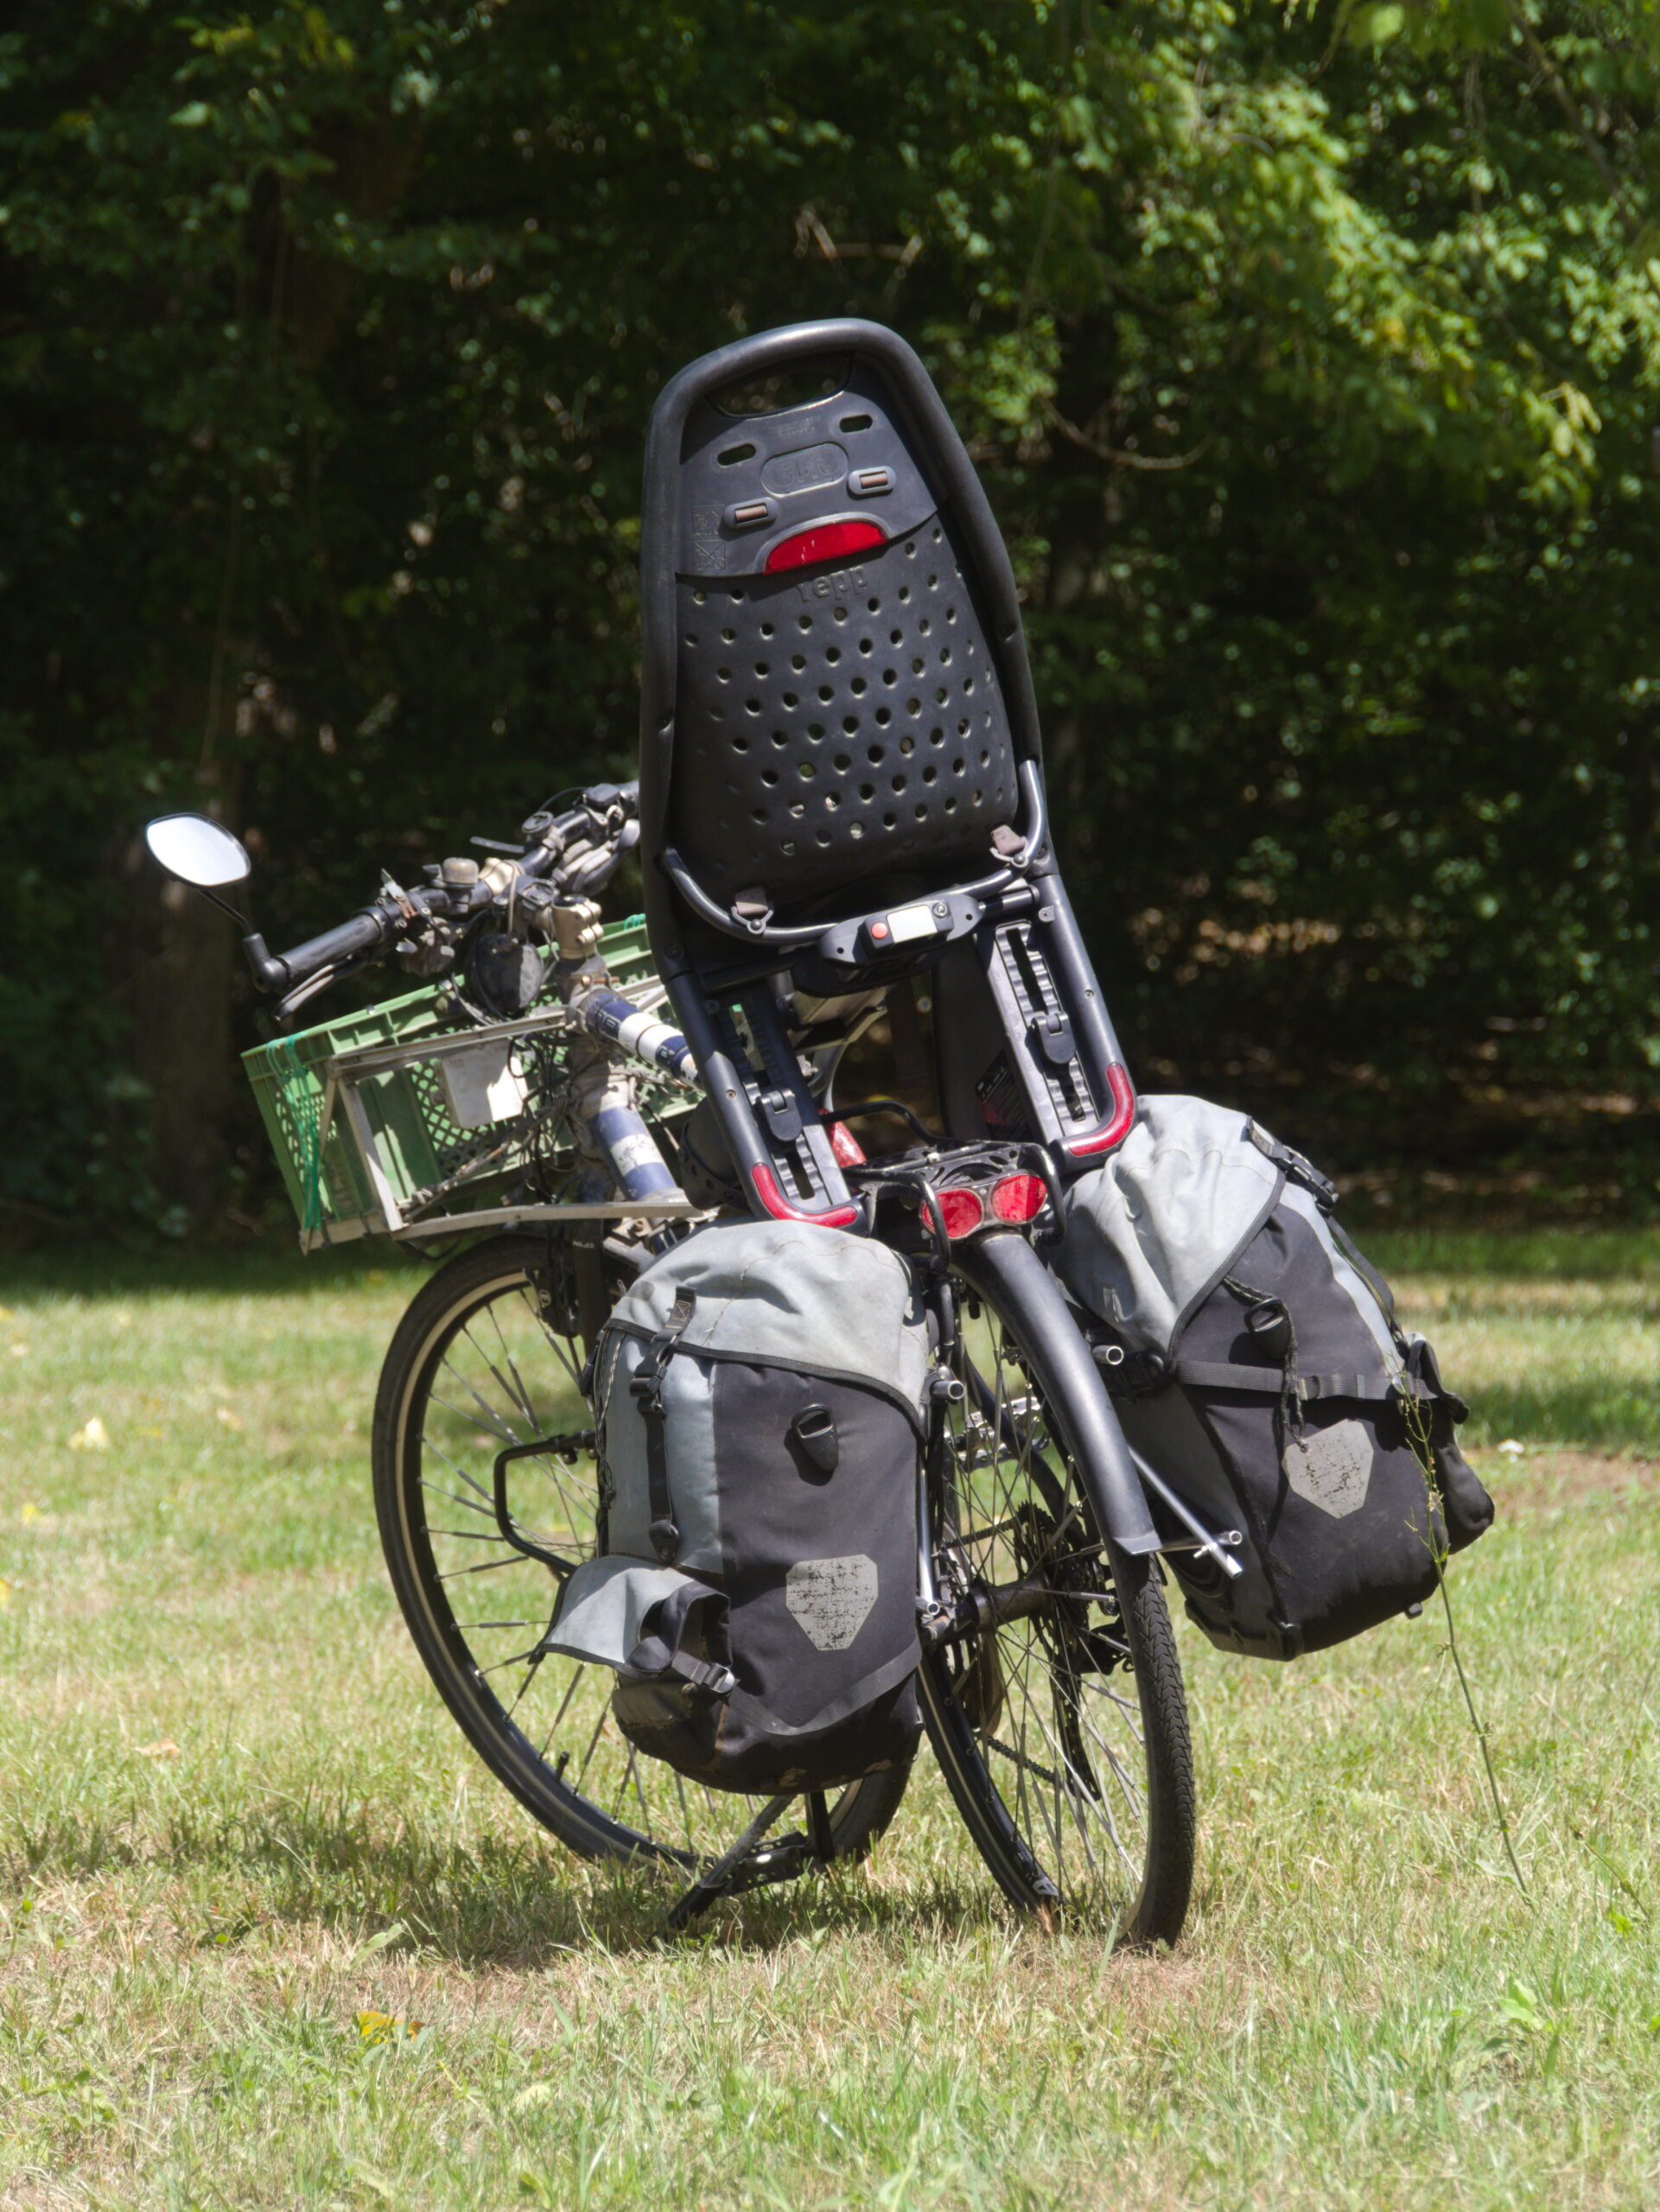
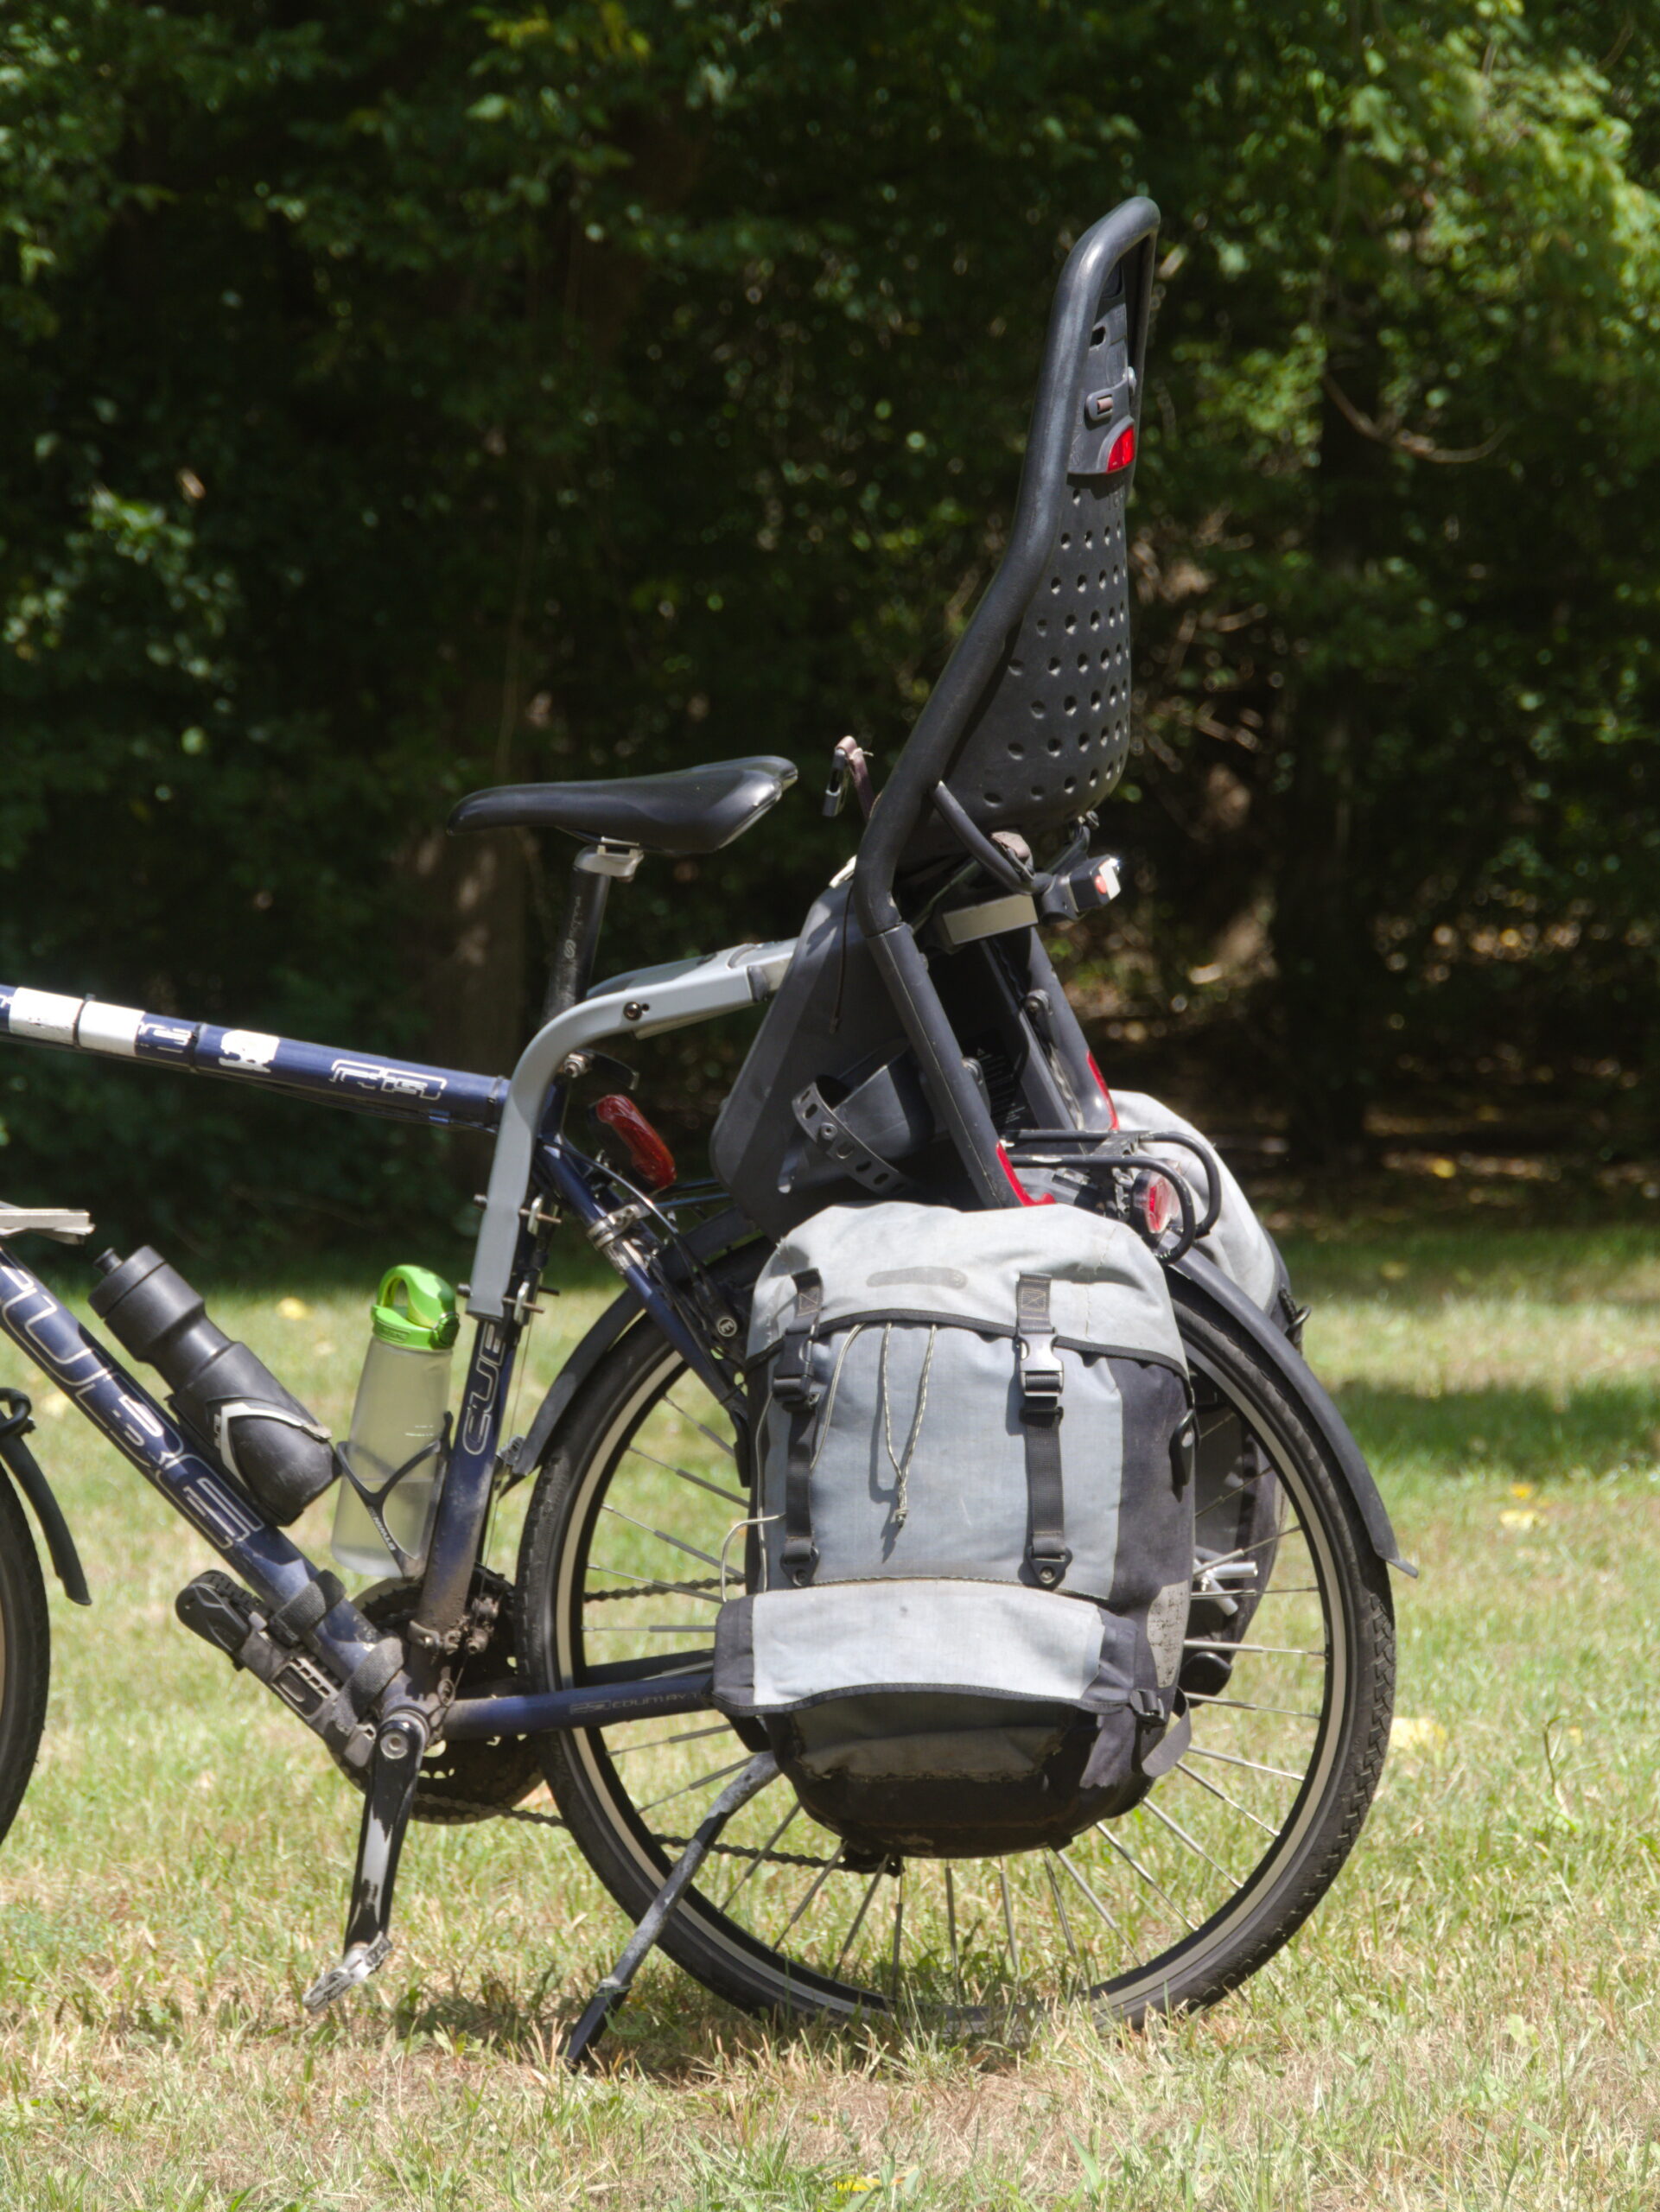
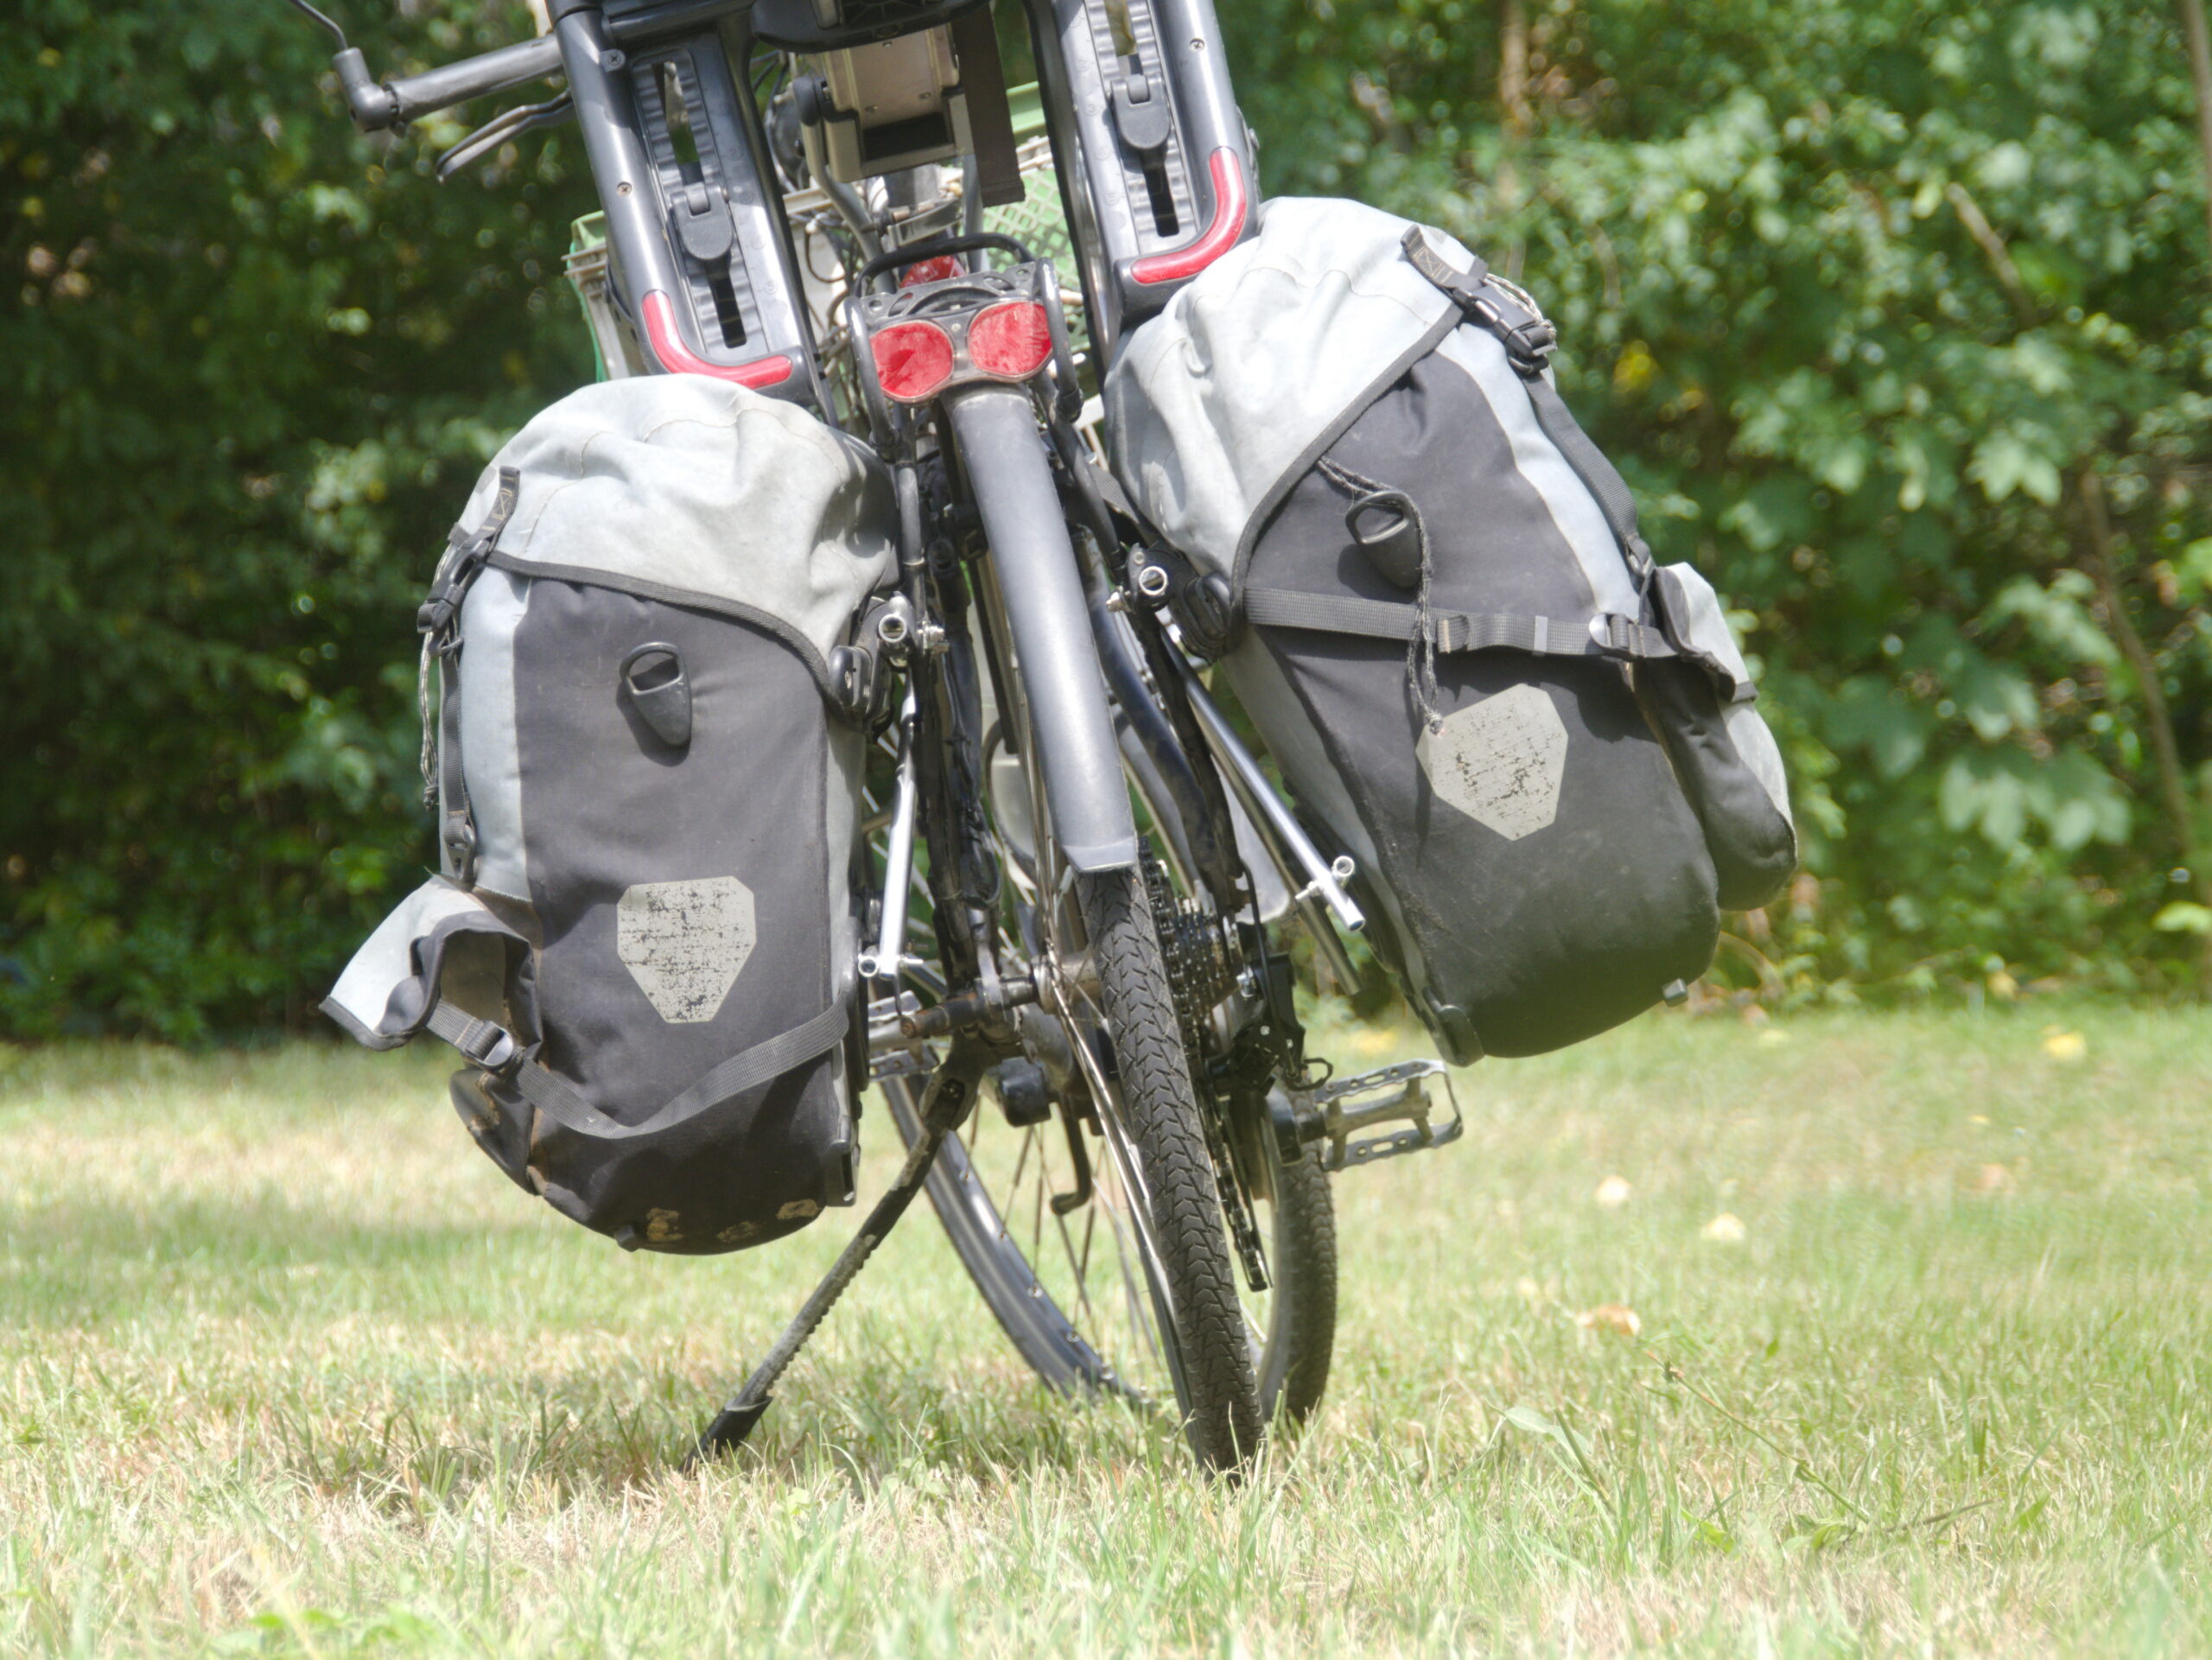
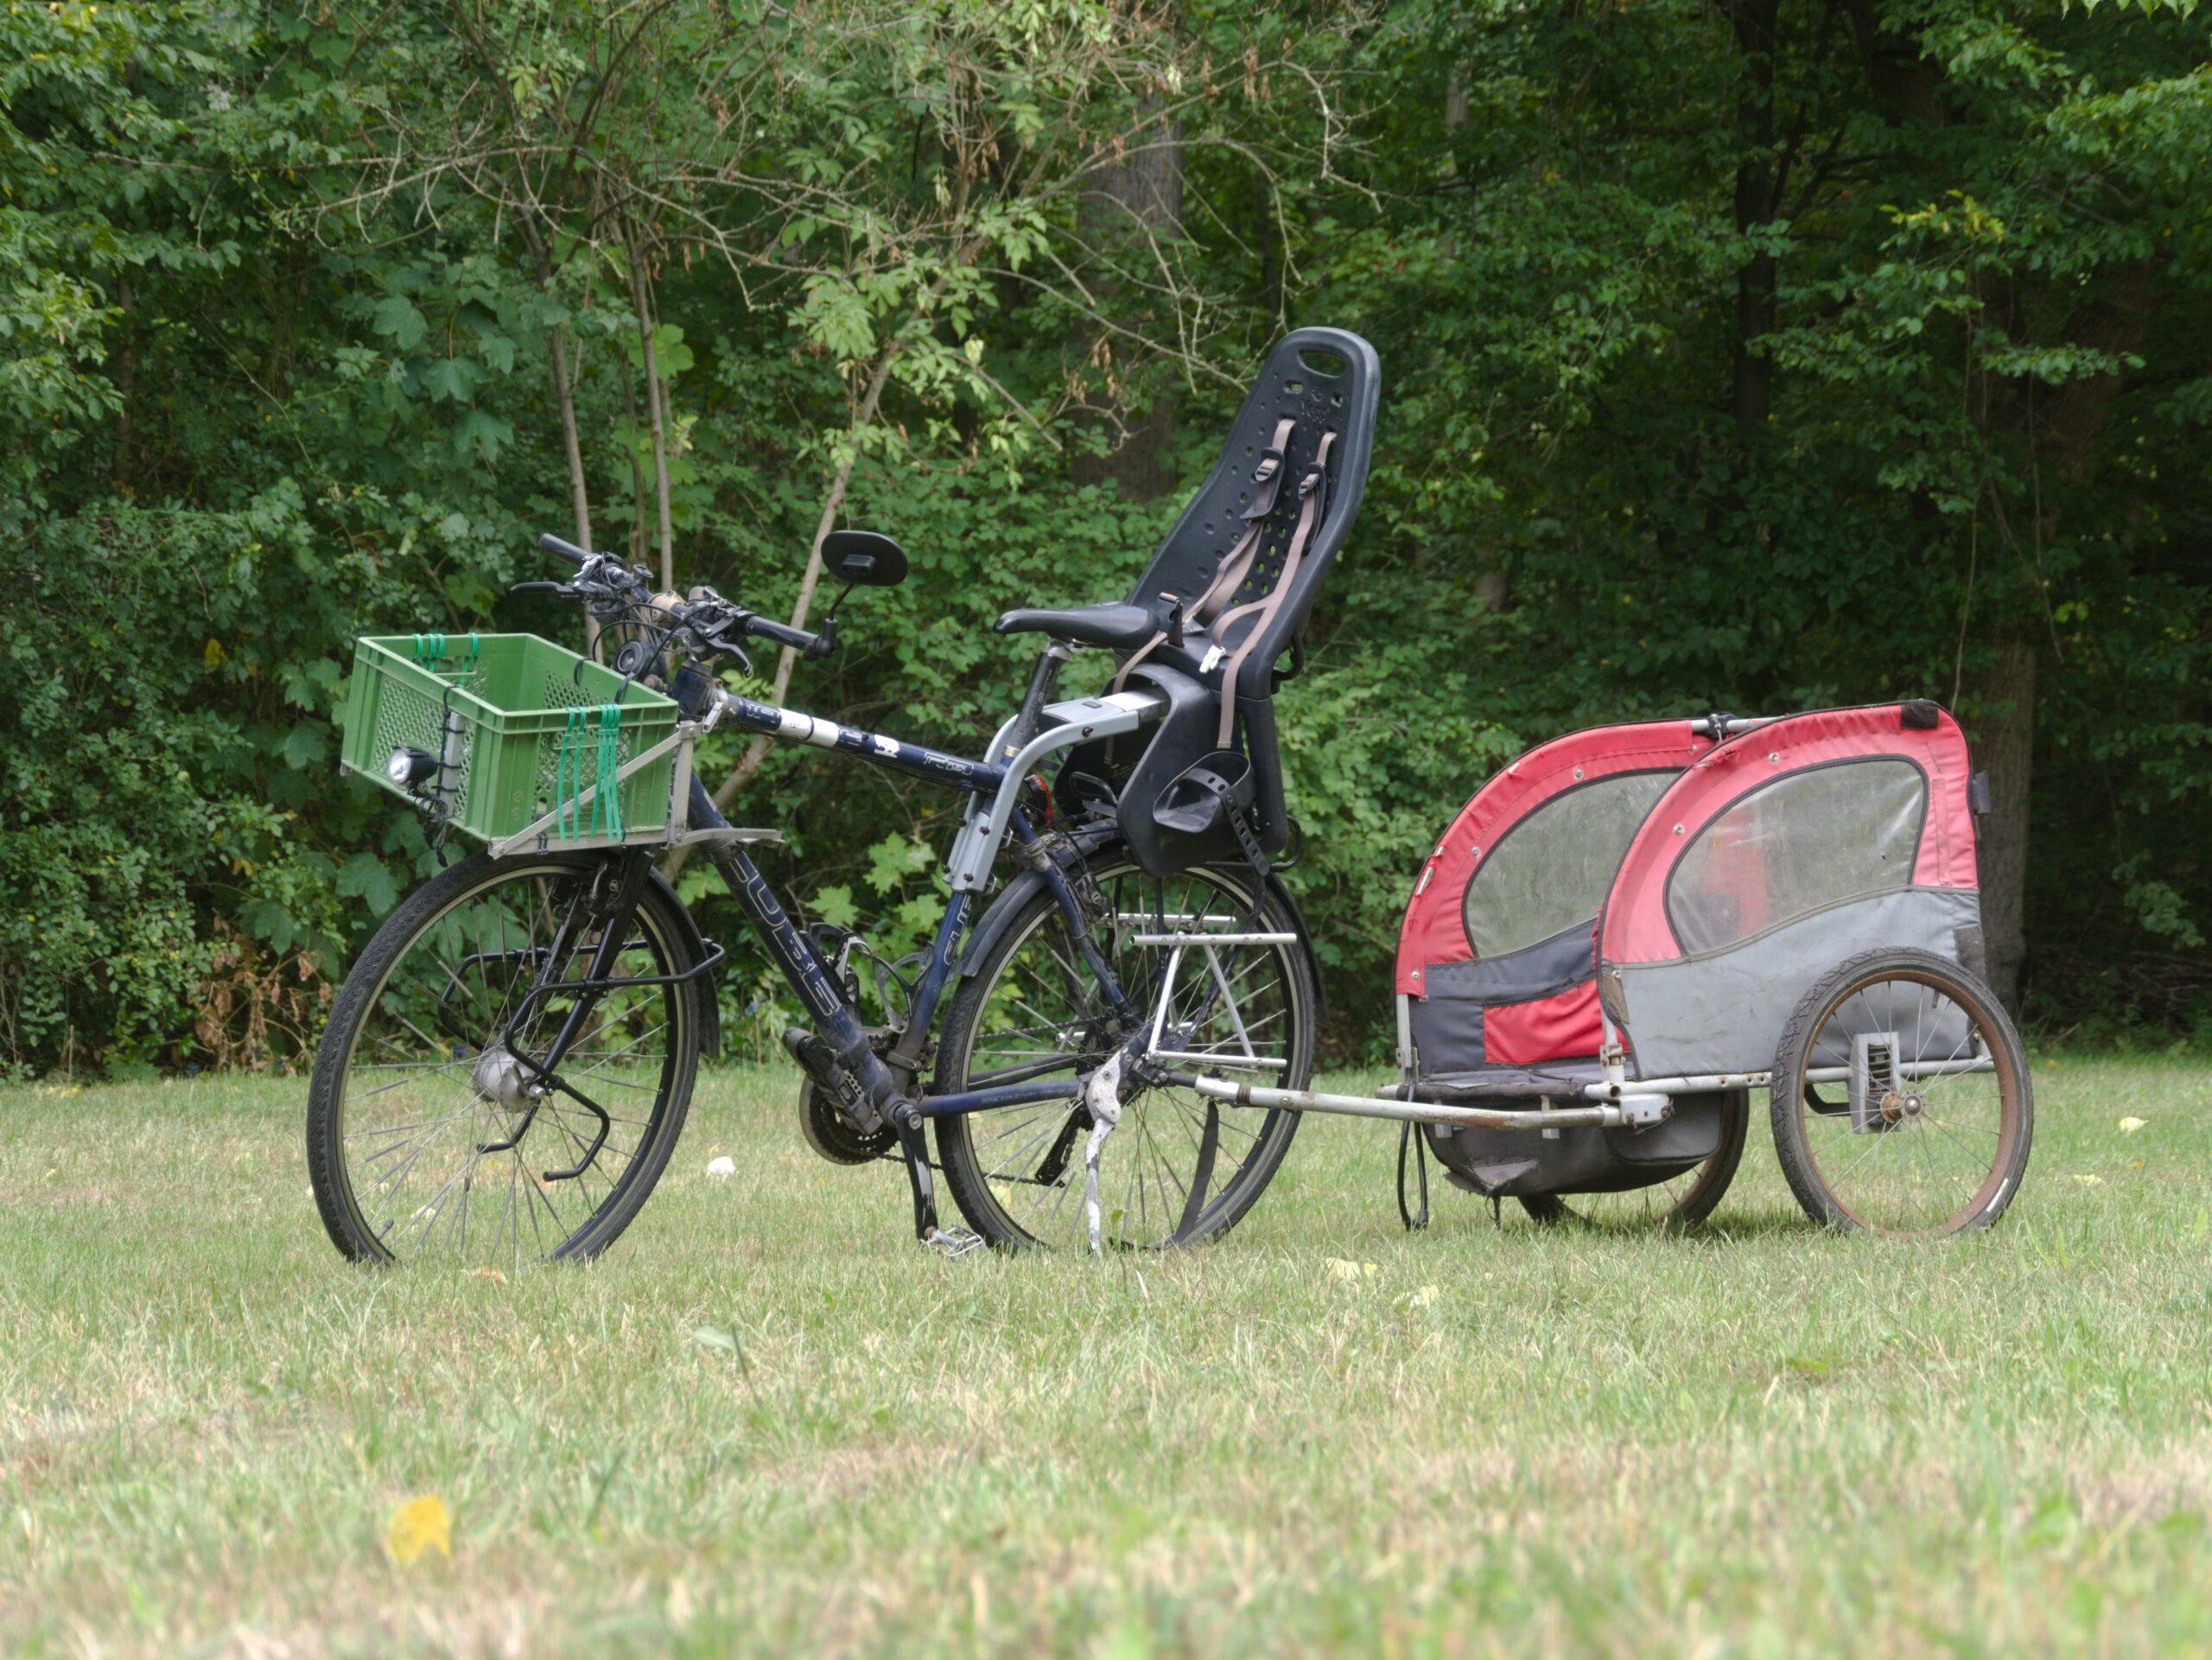
I found the following considerations important:
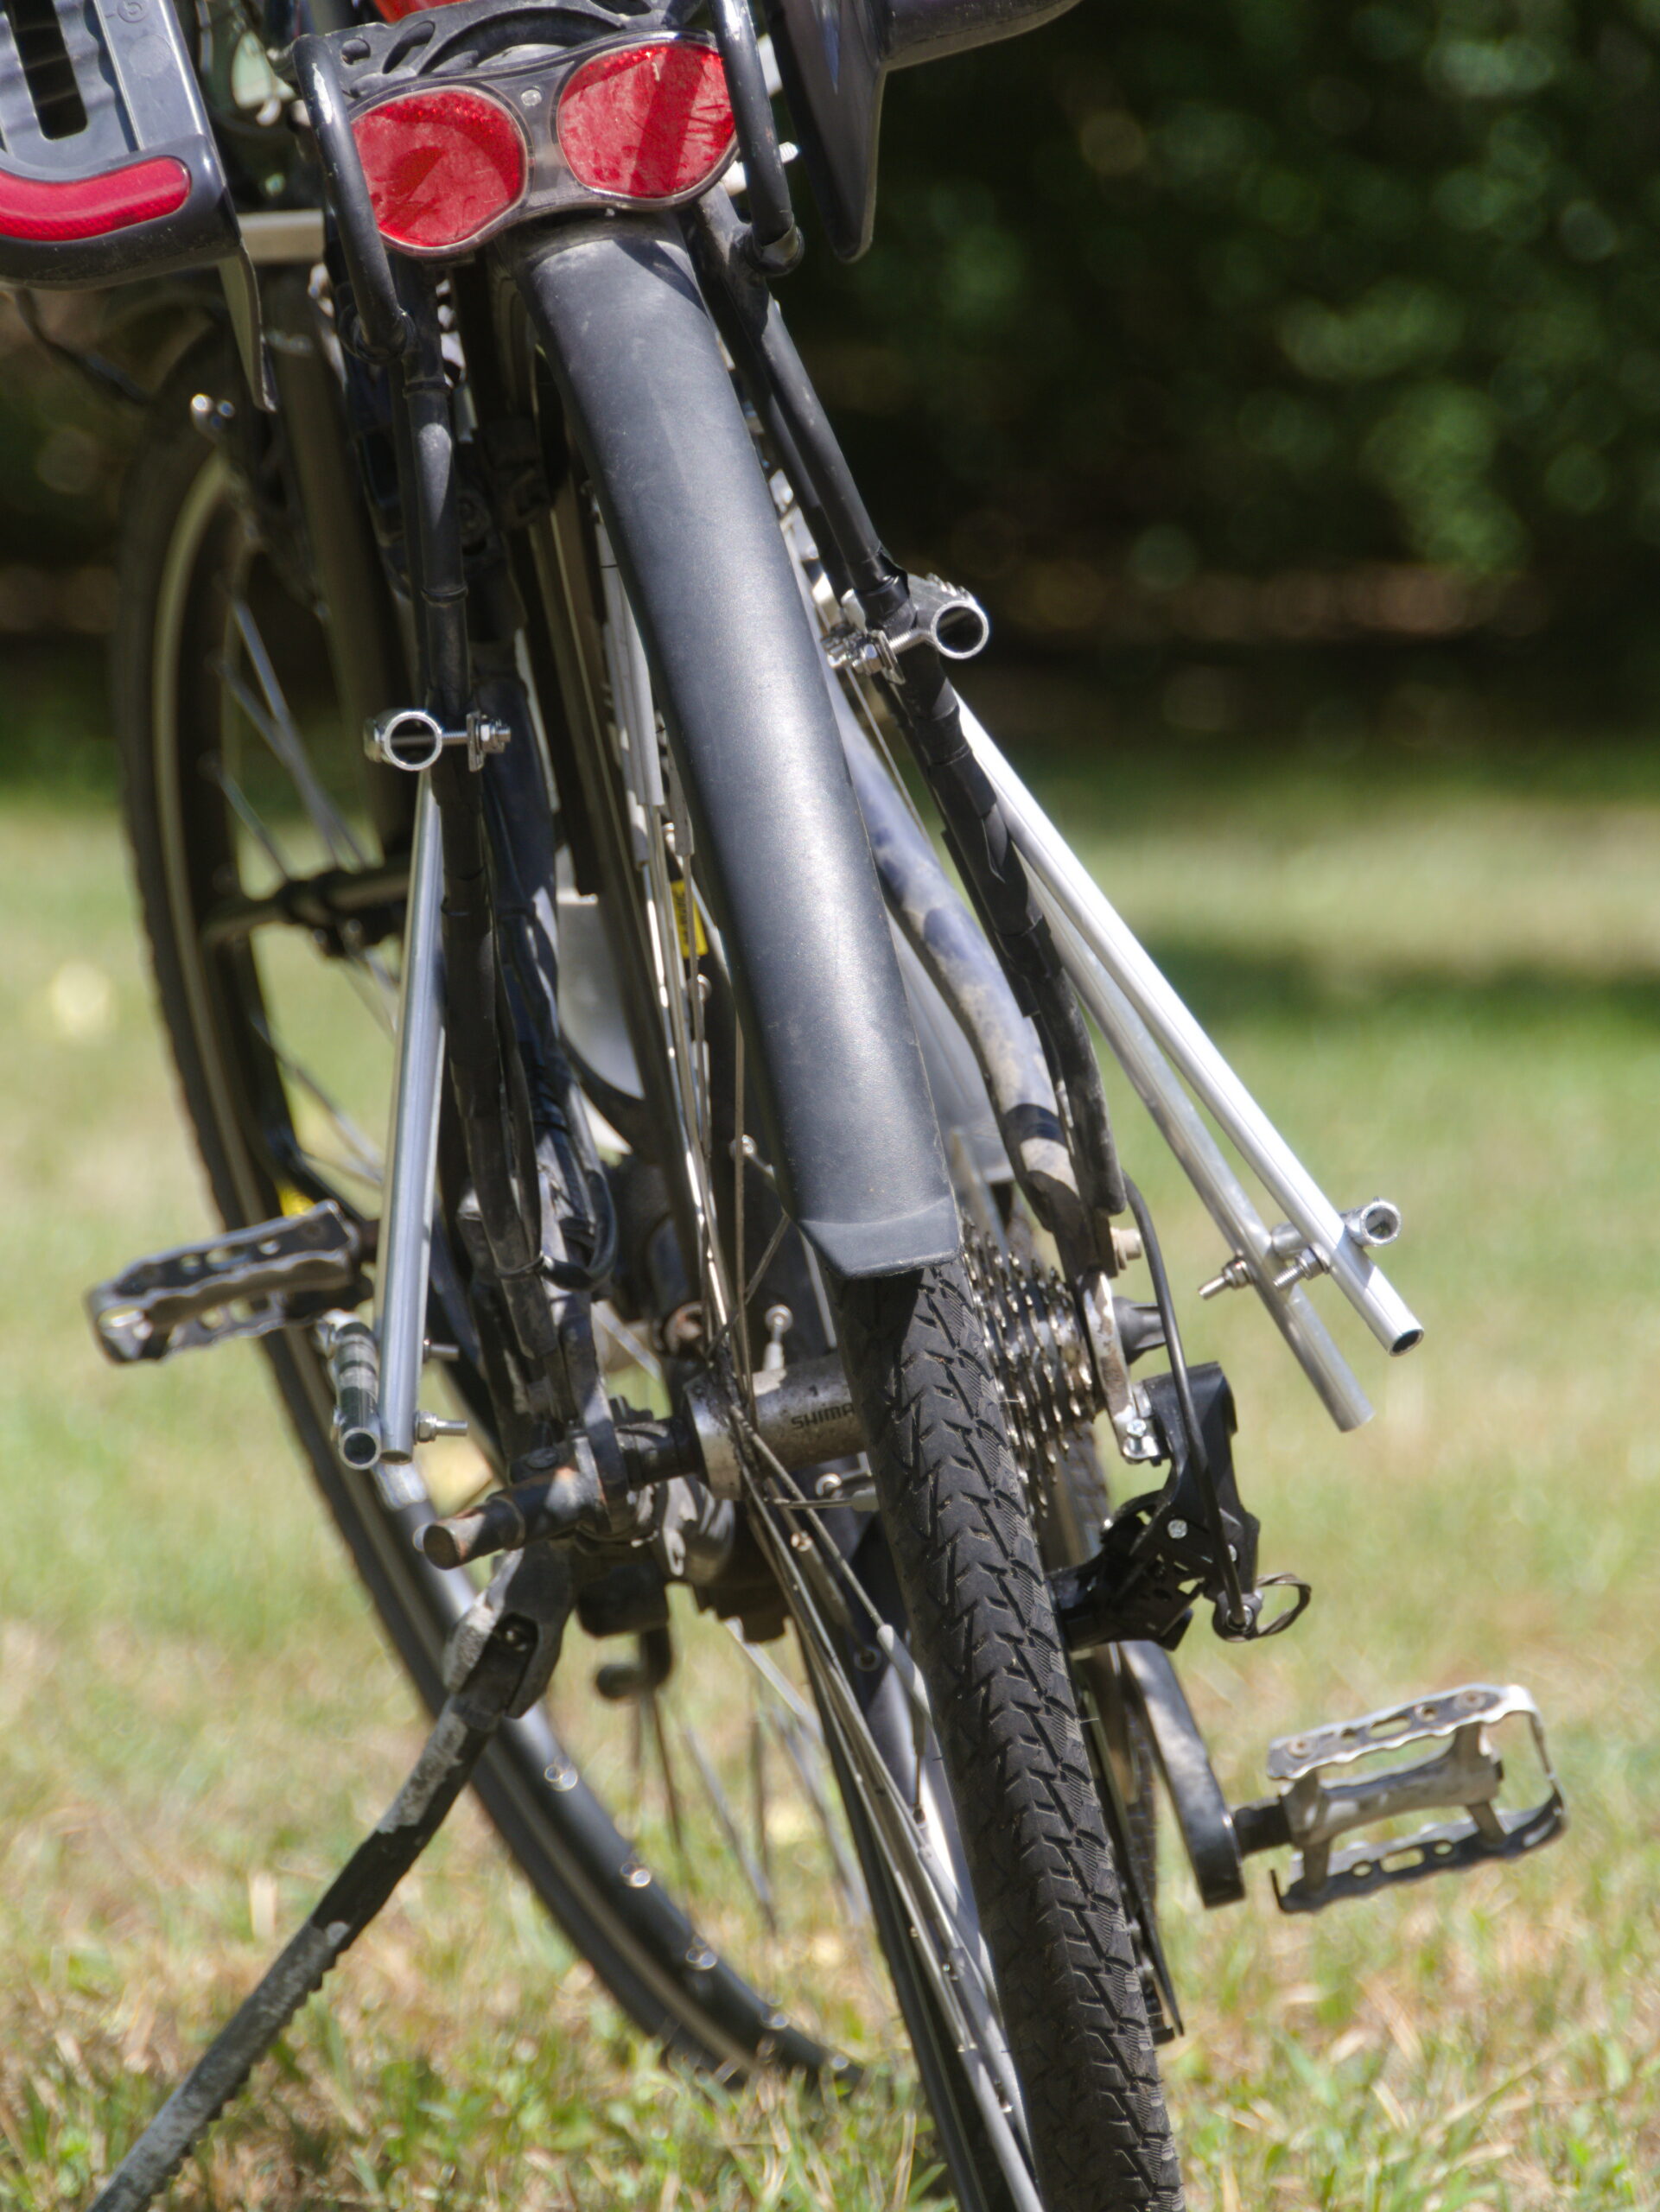
- On the right side, the bottom of the frame needs to have some distance from the bike and reach as far down as possible to protect the derailleur from the panniers.
- On the left side on the other hand, the frame should ideally stop above the axle to allow a trailer to be attached there and for its arm to rotate freely (including when the bike is tilted in a left turn). I won’t be able to pull a trailer while having a pannier there, but for pulling one on the tour I could remove my pannier and load it onto the trailer, and also I’m planning to leave the frame permanently installed, and this way it won’t be in the way when I pull a trailer at home without luggage on the bike.
- Also, as opposed to the right side, the bottom of the frame should be as close to the rack as possible on the left side (the pannier should be straight and not tilted). When walking the bike (if you walk left of the bike), your right foot will hit the pannier otherwise. Also there will be more space for a trailer arm in left turns. I only realized all this after I had already built the frame, so on my bike the left side is tilted as well. On the other hand, if the left pannier is too close to the frame, it might interfere with the kickstand.
- Since part of the weight pushes onto the rods of the rack sideways (especially on the left where the frame is tilted outwards to protect the derailleur), the rack needs to be very stiff to not bend. I think steel racks are not suitable for this, as they tend to have very thin rods. A good aluminium rack would be advisable. I have one by Racktime, and I can definitely recommend it. (I have the model with two “levels” for hanging panniers, which allows putting panniers underneath other luggage on top of the rack, but now with my custom frame I don’t even need that second level anymore.)
-

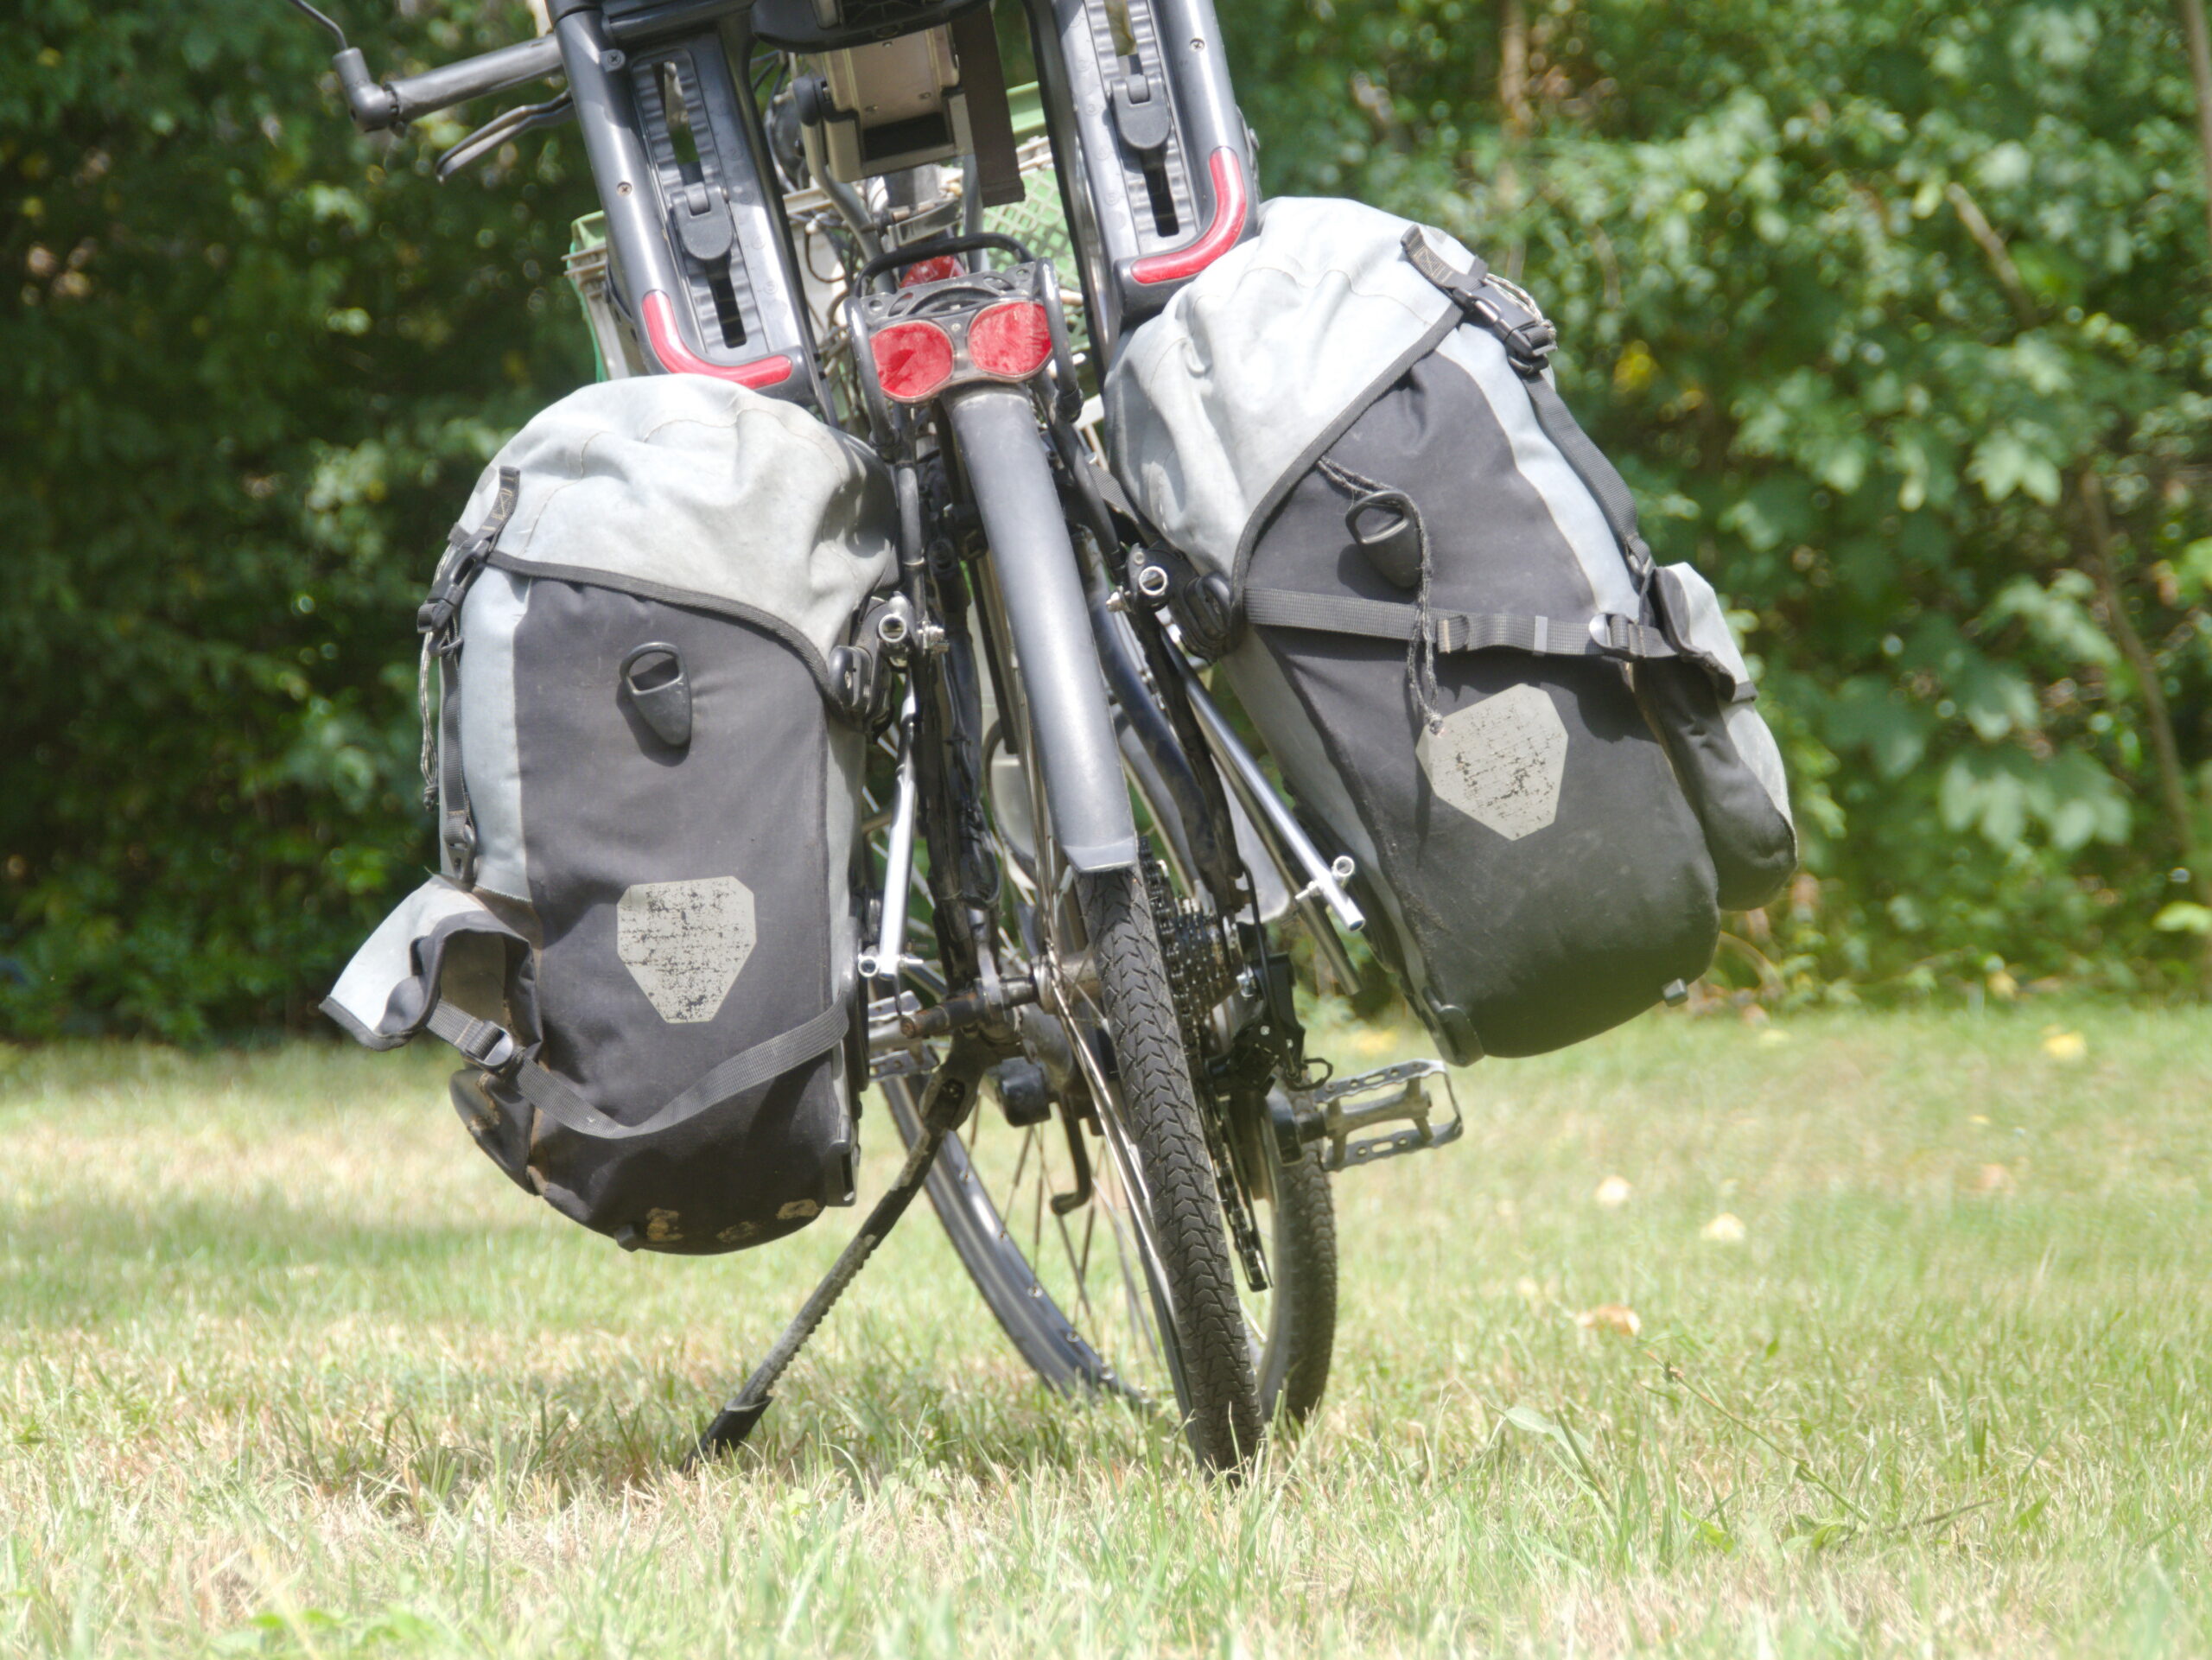
- The frame keeps the panniers at a distance from the bike.
-
- On the right, the frame reaches far down to protect the derailleur.
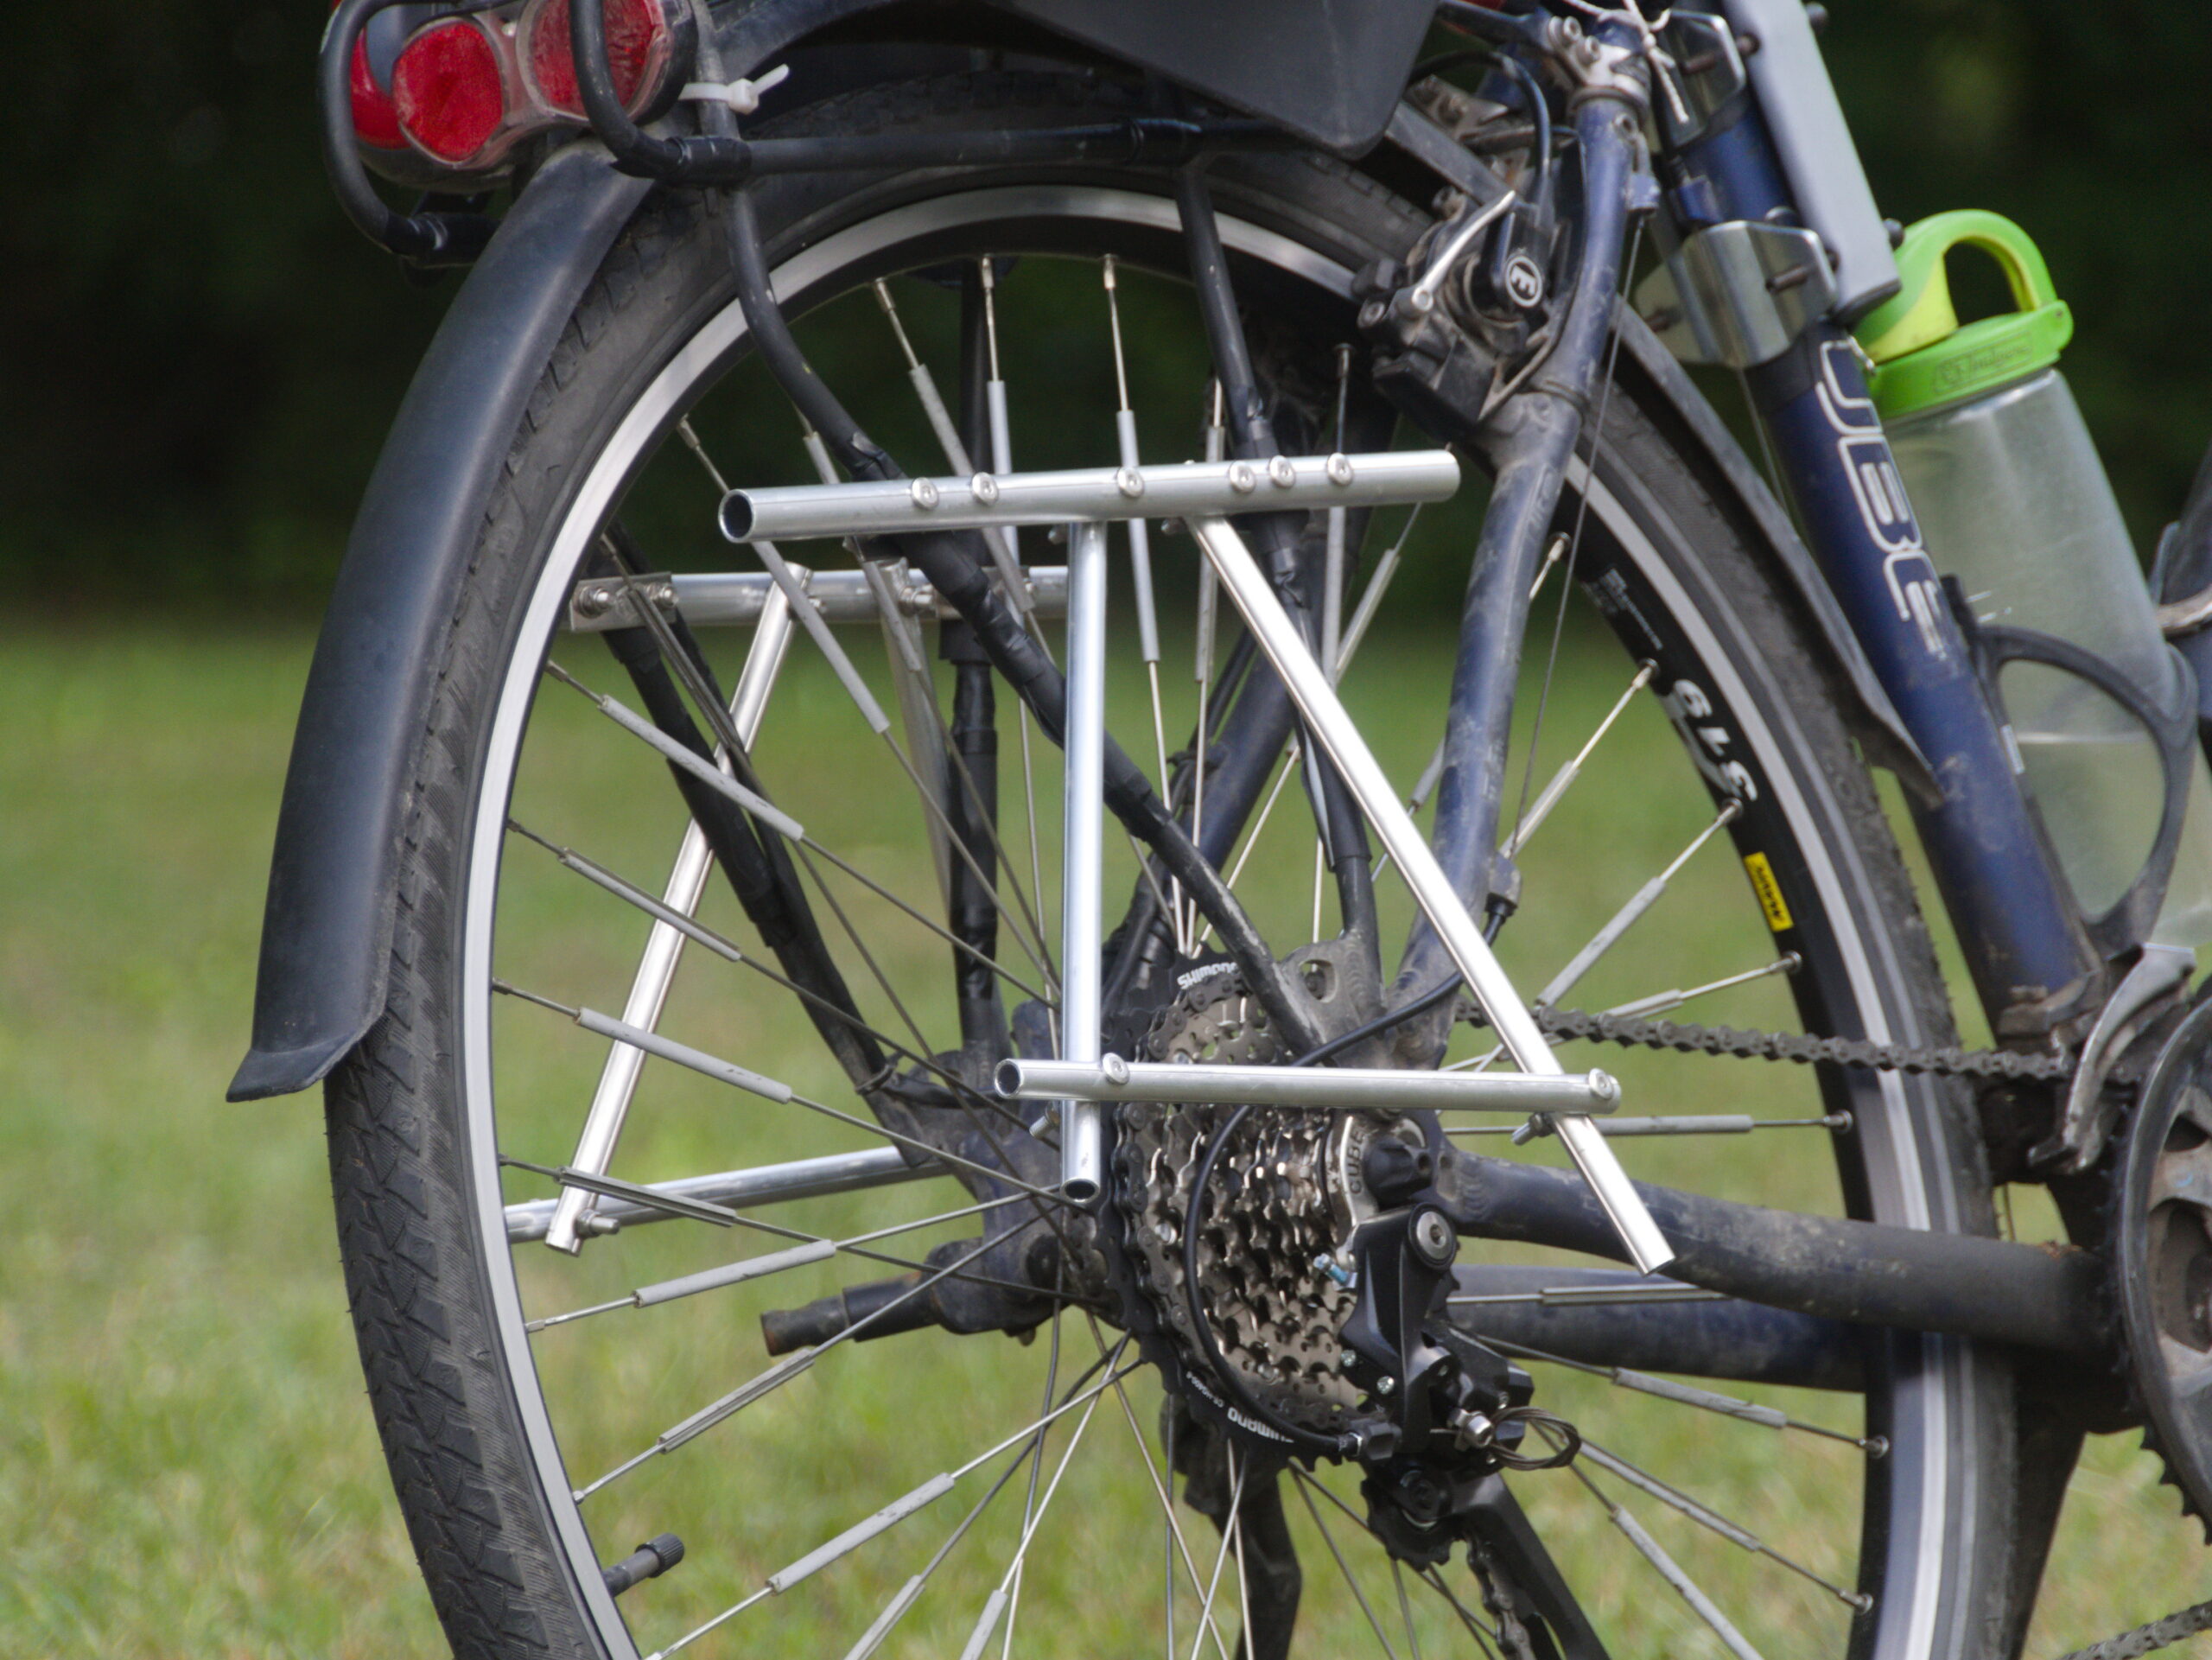
-
- On the left, it reaches less down to leave space for a trailer arm.
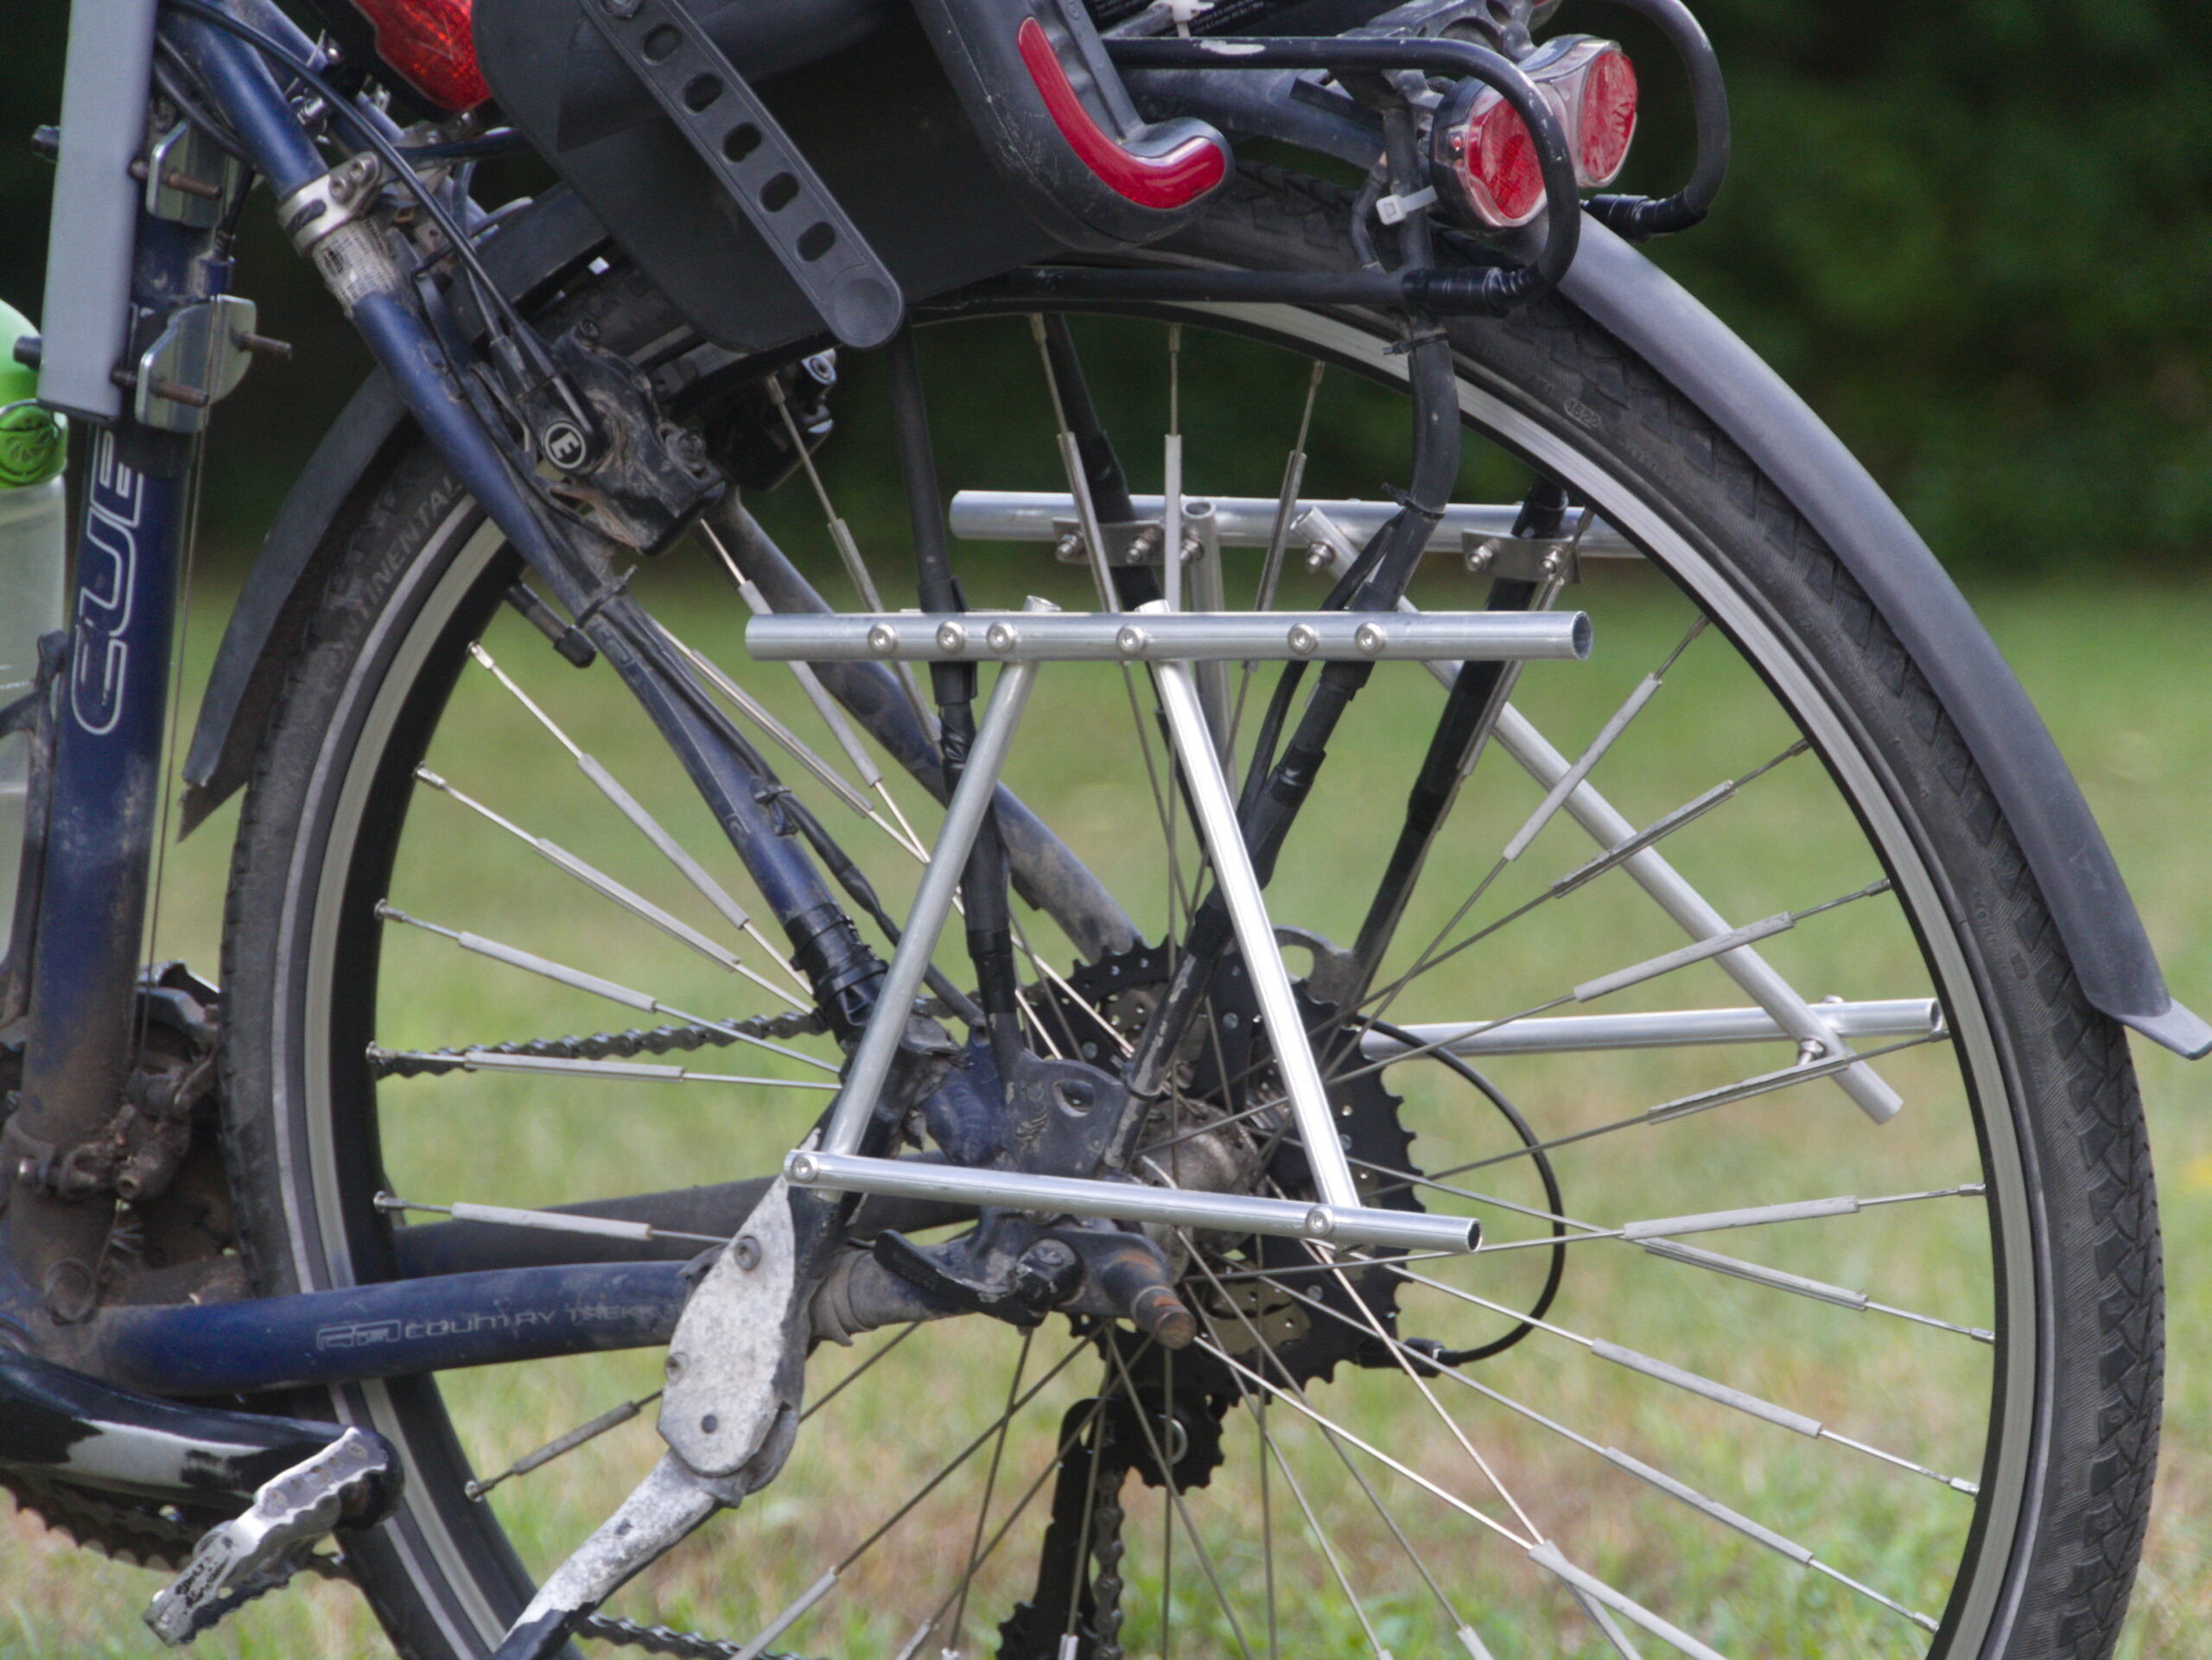
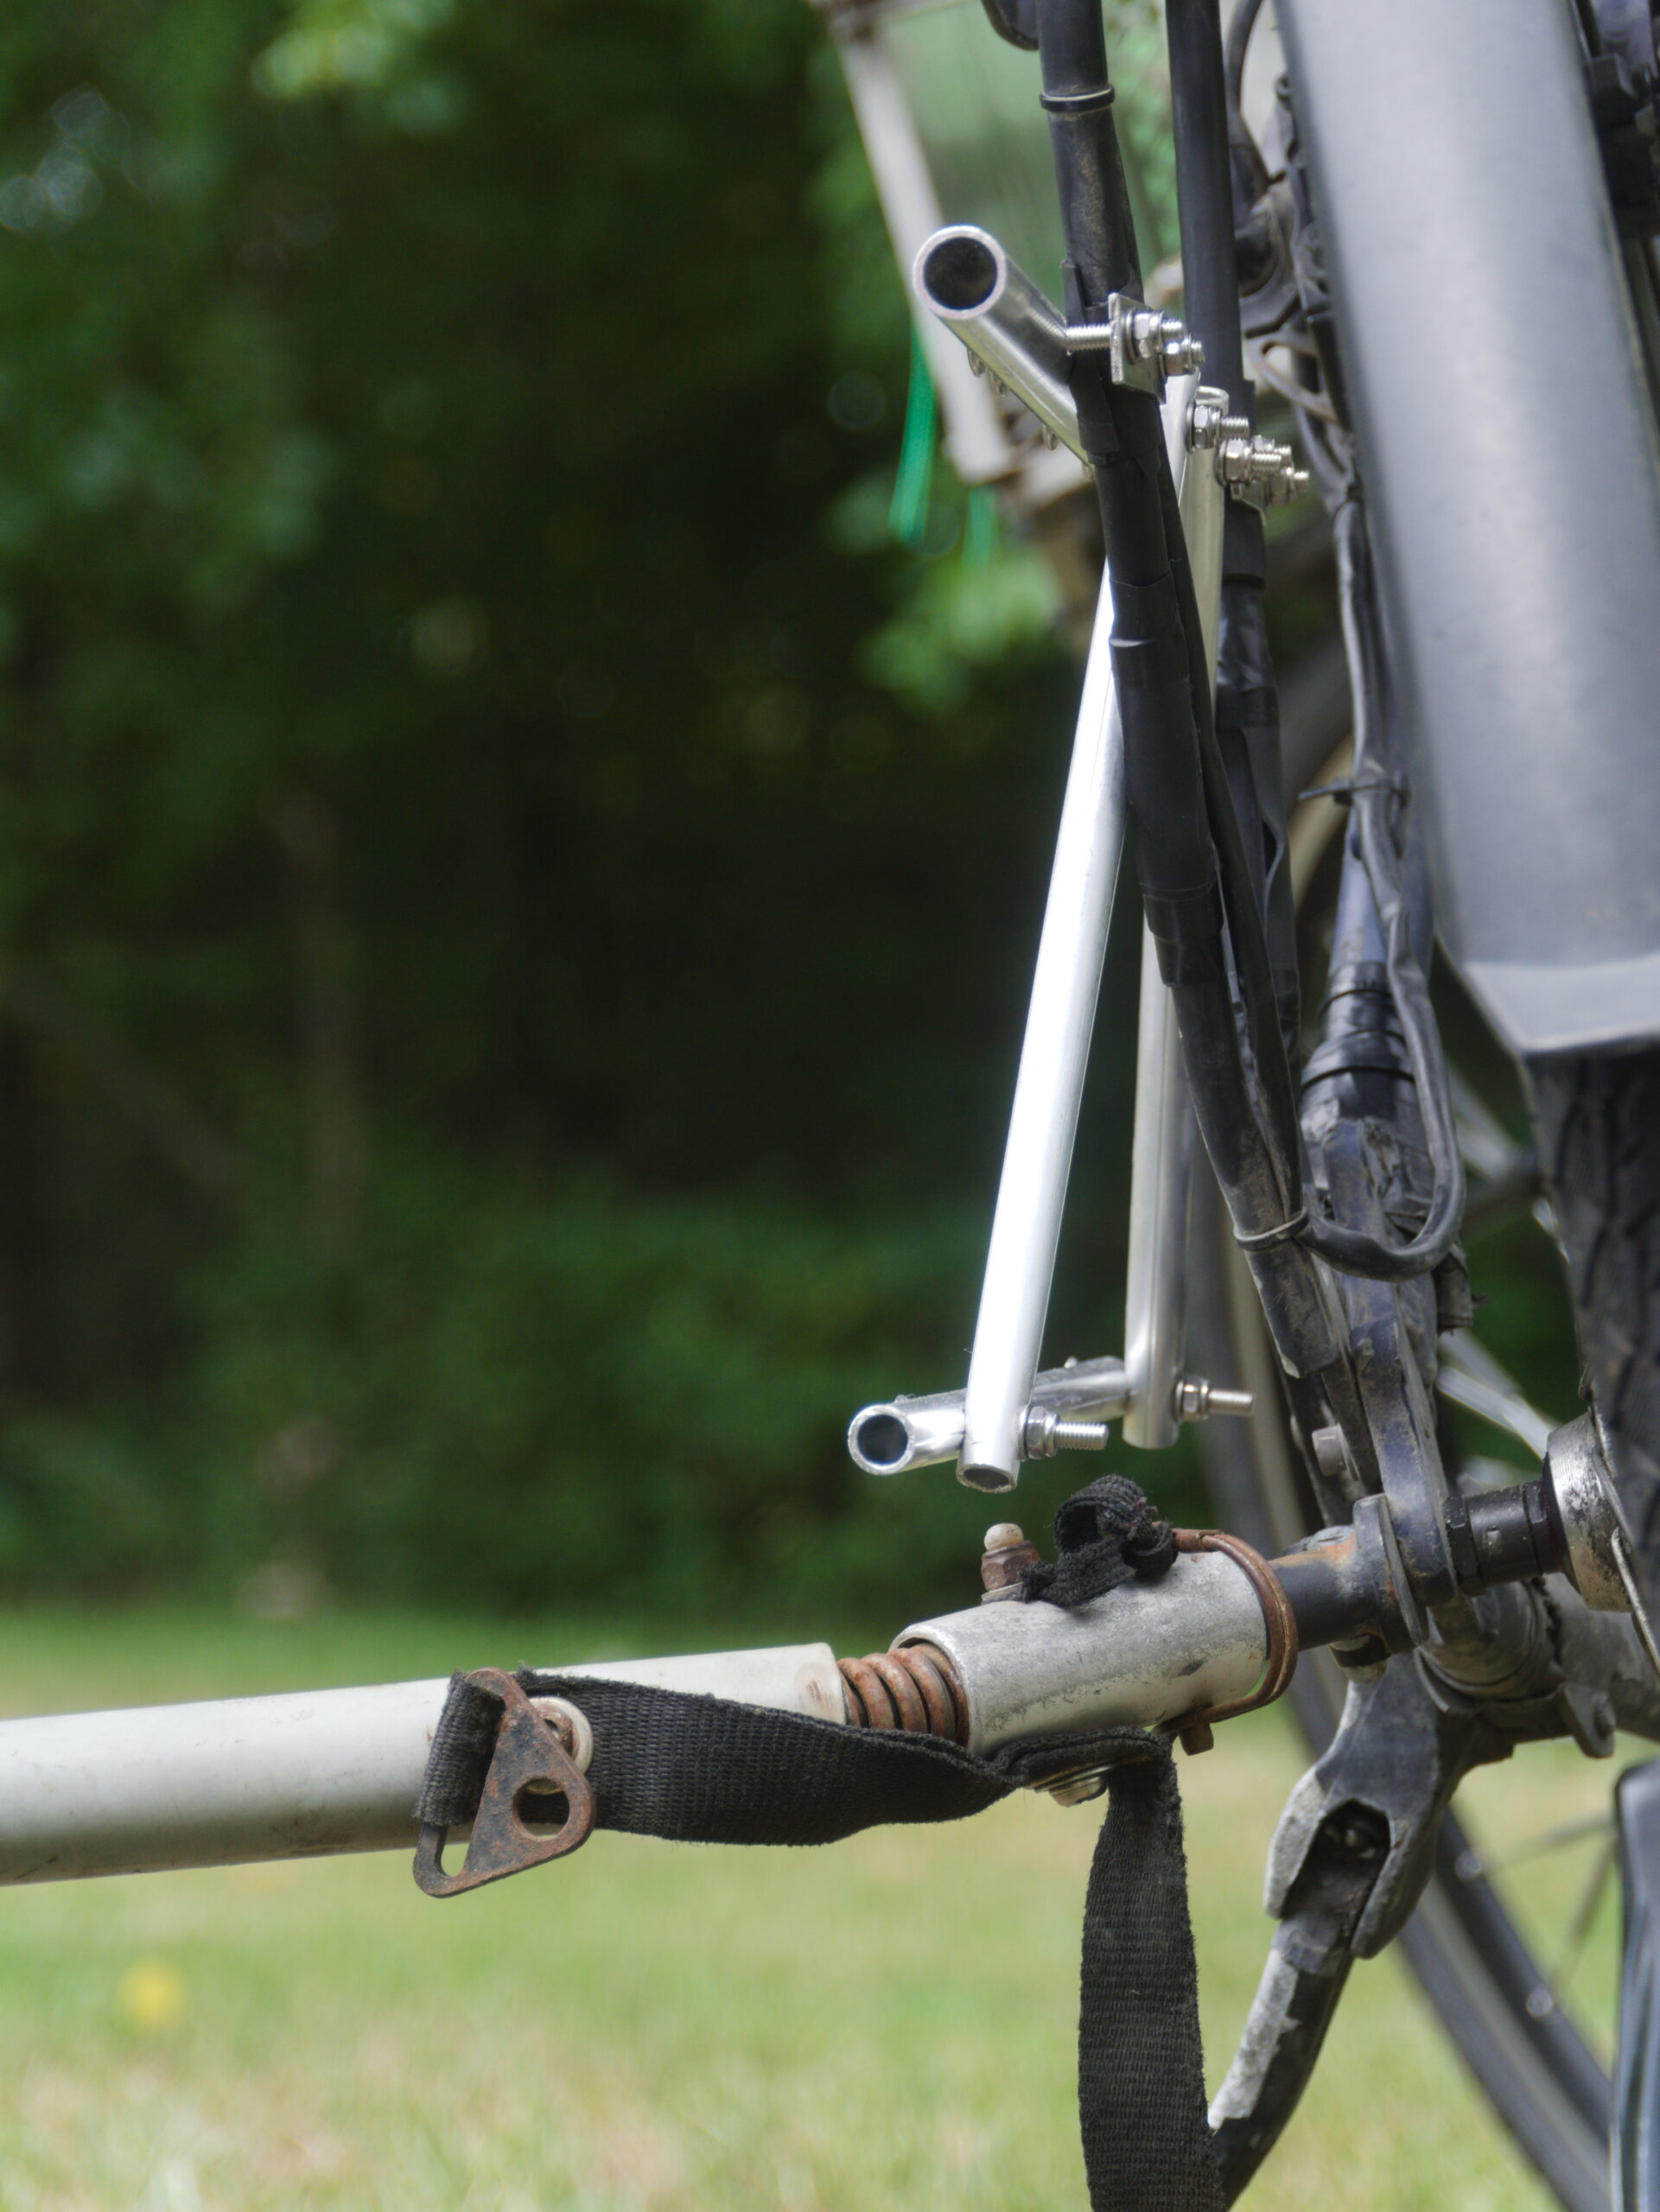
-
- The child seat attachment is attached to the frame as high as possible.
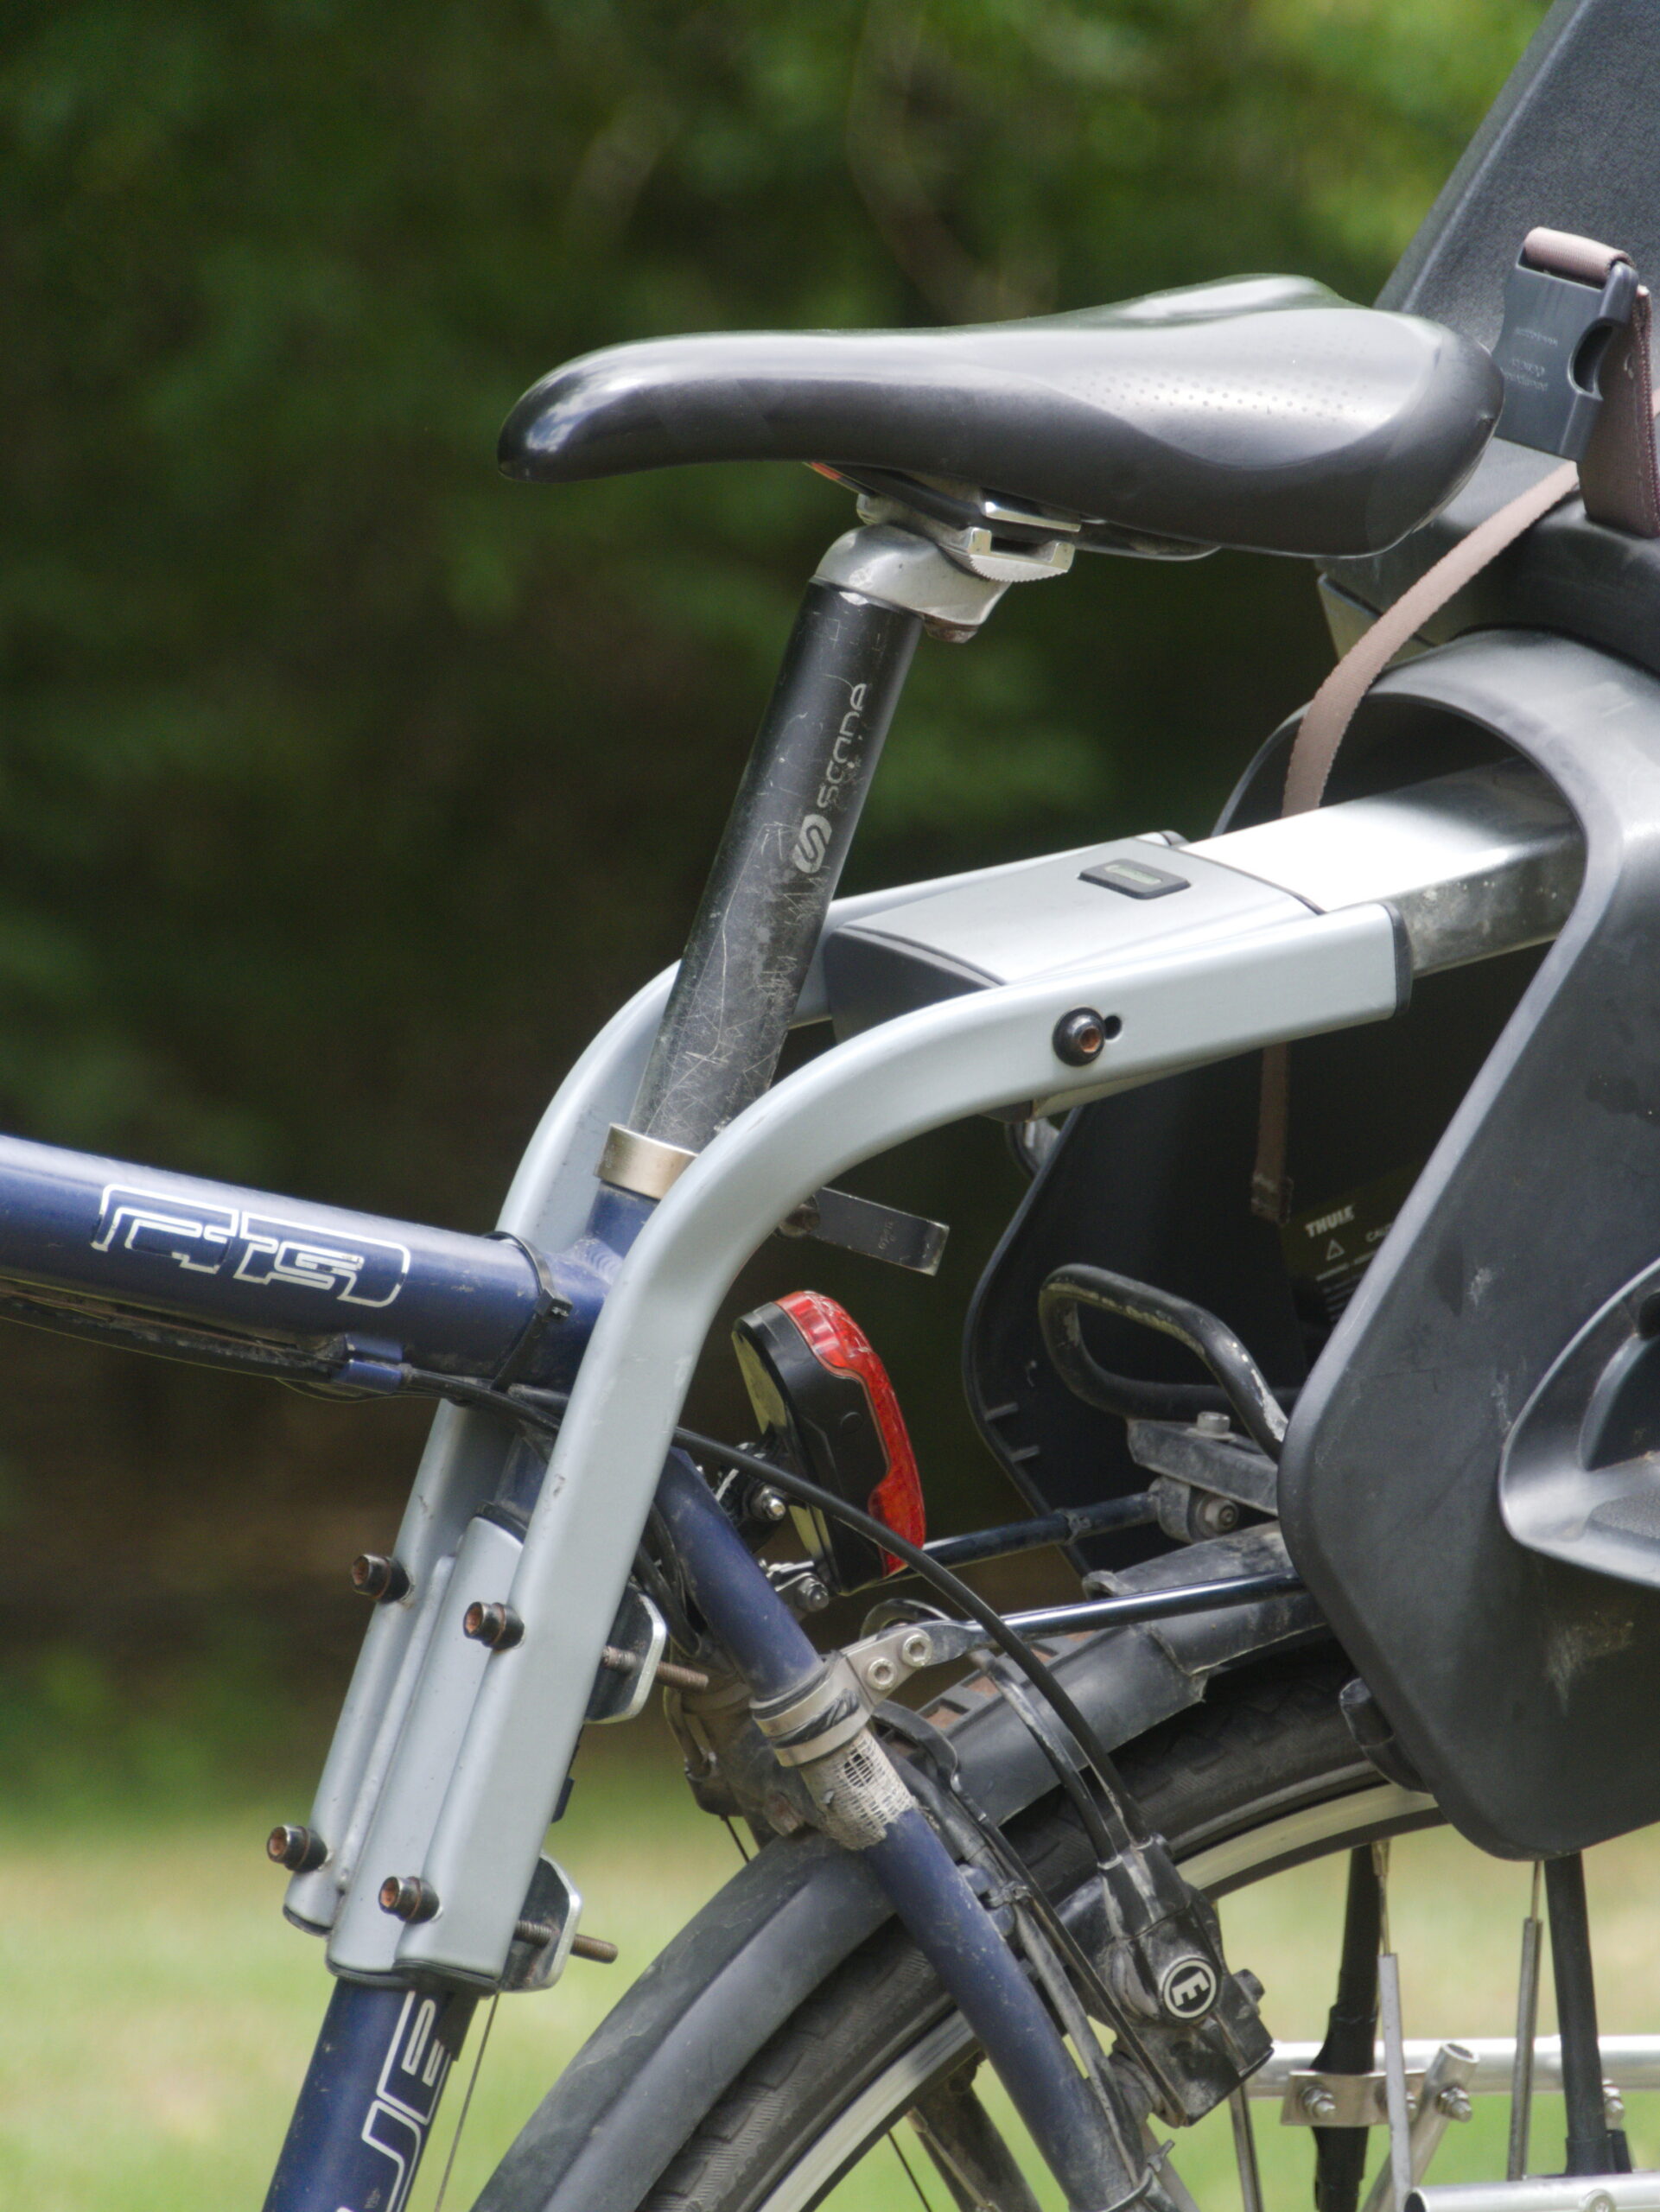
-
- I had to flip the seat post quick release to keep it accessible.
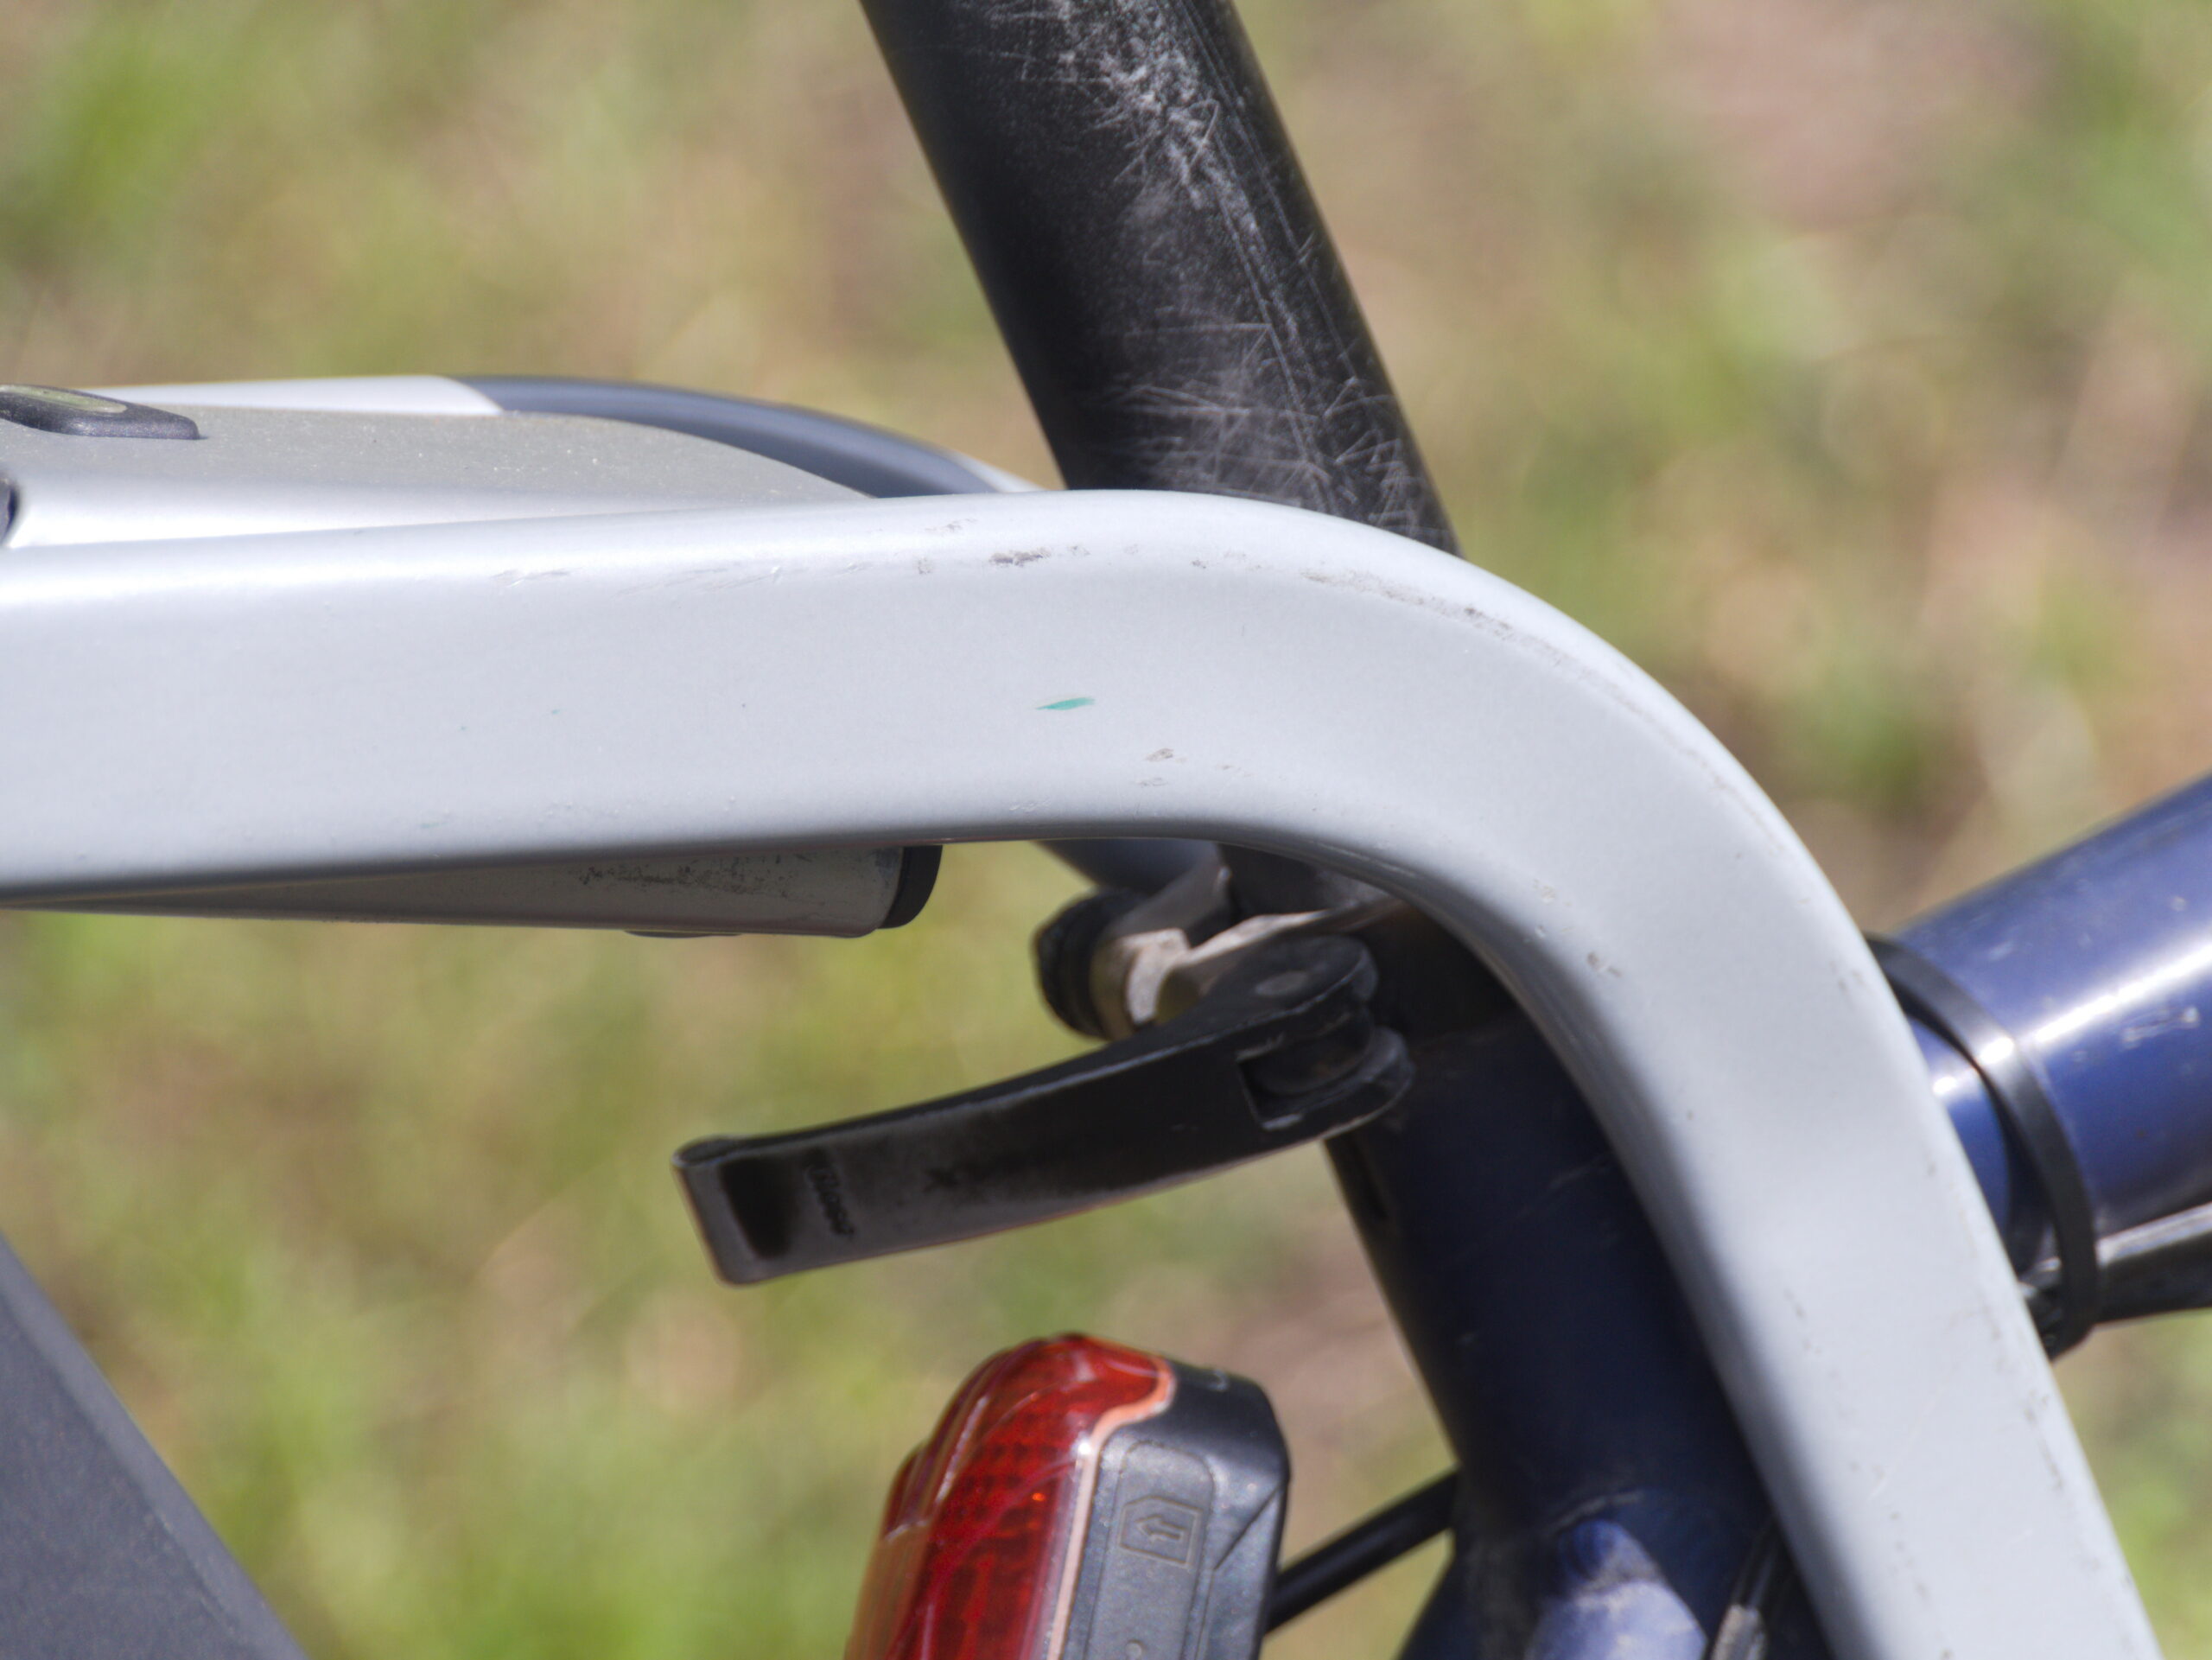
-
- The top hooks and bottom hook of the pannier hook into the frame.
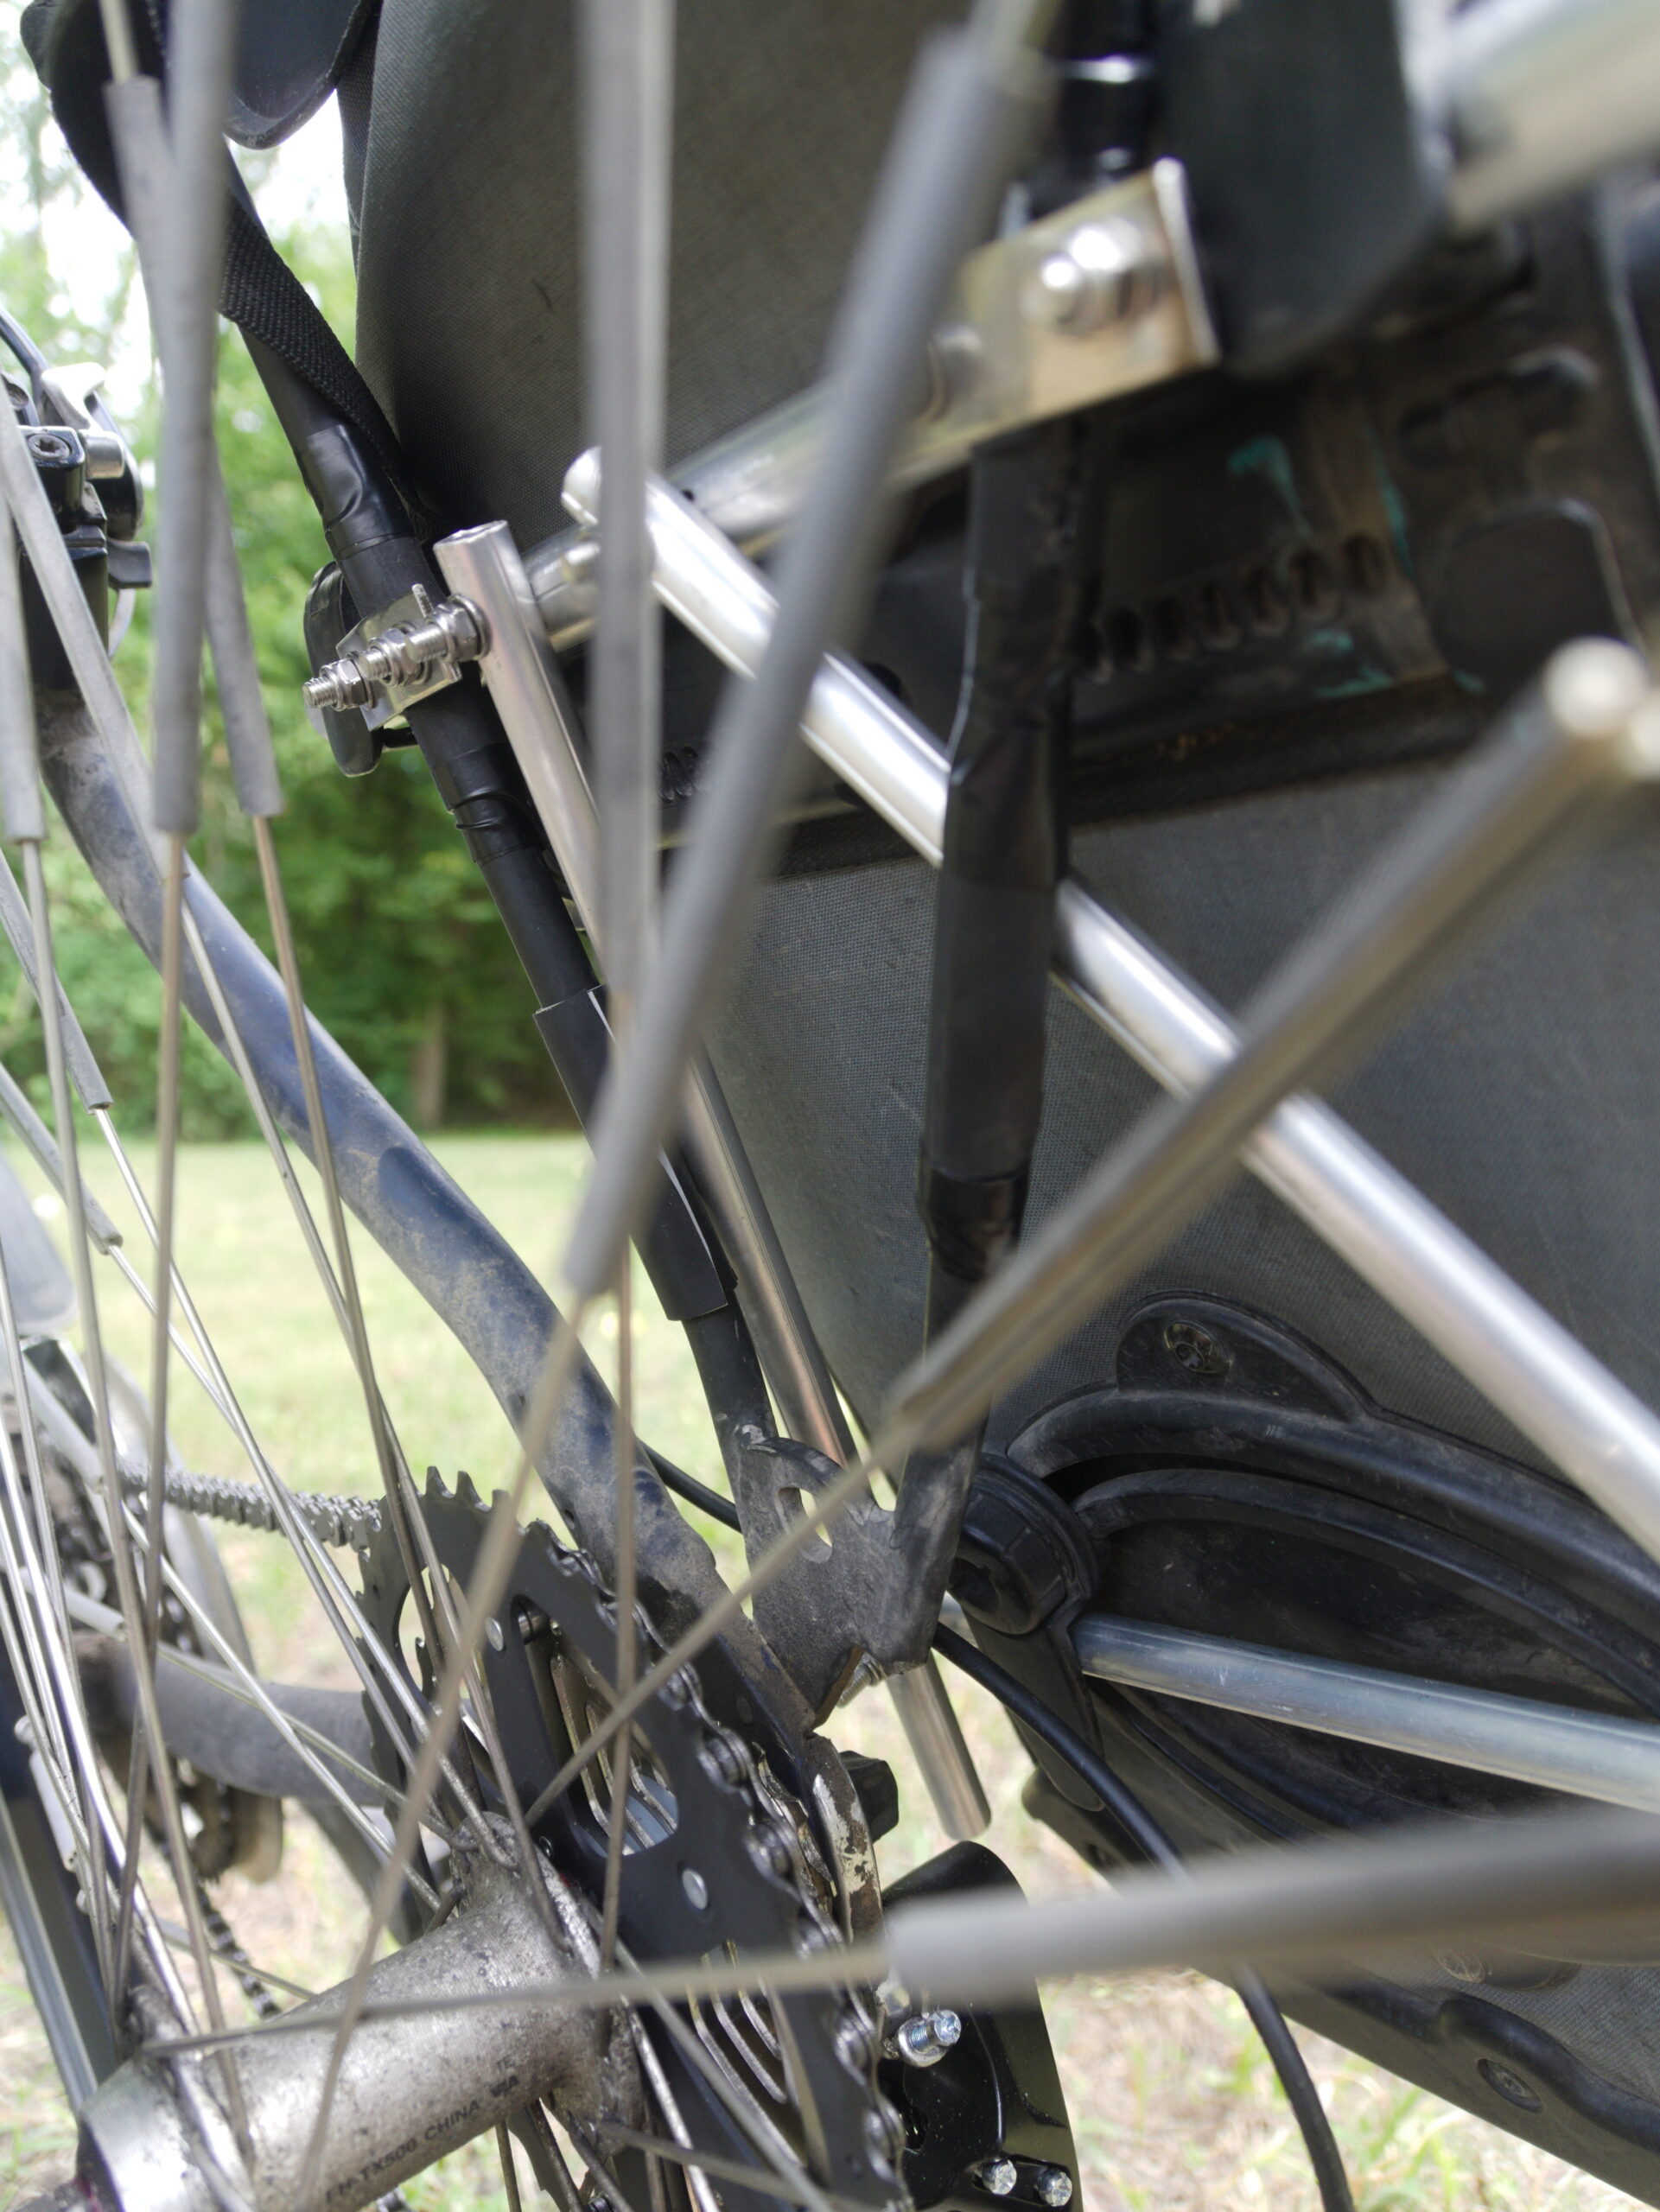
To build the frame, I used aluminium rods from Bauhaus. At Bauhaus they sell aluminium rods with a thickness of 1.5 mm, while at other shops I could only find a thickness of 1.0 mm. I think the additional thickness will have a significant impact on the stability of my construction. I used the following materials:
- Round aluminium pipe with 15.5 mm diameter and 1.5 mm thickness. While the rods of my rack are normally around 10 mm wide, for the hooks of Ortlieb bags you need adapters for that width, and the hooks bend open a bit after a short while, causing the adapters to fall off and get lost, but also the bags to fall off the rack on hard bumps. I found that the Ortlieb bags fit perfectly on the 15.5 mm rods without adapters, so I used one rod of 30 cm length on each side for the main hooks of the panniers. (1 m of pipe, 3.95 €)
- Round aluminium pipe with 11.5 mm diameter and 1.5 mm thickness. I used this to build the triangles that would include a horizontal rod at the bottom of the frame to hold the bottom hook of the panniers. I roughly needed a total of 165 cm of rod for the 6 pieces. (2×1 m of pipe, 6.80 € in total)
- To clamp the rods to the rack, I cut these stainless steel flat angle brackets in half (each half has 2 holes, and their distance fits perfectly around the rods of my rack). (2 brackets, 2.90 € in total)
- I needed 12 M5×35 mm screws on the top rods and 4 M5×30 mm screws on the bottom rods. First I used the hex bolts, washers and nuts from Sonderpreis Baumarkt, where you can get stainless steel screws for 20 €/kg (that’s probably less than 2 € for all the screws, at other shops stainless screws are often 5× more expensive or even more). But I found the screw heads a bit too bulky; the panniers were often getting stuck on them when taking them off. In the end I bought some stainless M5×35 mm screws with a flat head online. (6.29 € for a pack of 20)
So the total cost of the build was 20 €, and with cheaper screws it could have been 15 €.
To attach the top rods to the rack, I first filled up the panniers to the top with some test luggage and then held them with the big rods to the rack to find the highest point that I could attach it without the seat blocking the panniers. I made sure to position the rods parallel to the upper rod of the rack to keep them horizontal. Then I drilled 4 holes in each rod, always two holes at the same distance as the holes in the flat angle brackets, and so that each pair would wrap around one rod of the rack. I wrapped the rack rod in some inner tube and then pressed the big rods against it by screwing the it between the big rod and the angle bracket.
Before building the triangles, I went for a test ride with the panniers attached to figure out how far back they need to be for my heels to not hit them. This is important, as the screw holes for the triangle need to be somewhere else than the pannier hooks.
To tilt the triangle away from the bike (to protect the derailleur), I attached it to the back of the big rod, but let it lean against the rack rods from the front, creating an angle. The angles of the two sides of the triangle were determined by the geometry of the rack, as increasing/decreasing the angle would make the rod lean against the rack in a different place and increase/decrease the distance of the bottom of the triangle from the frame. In addition, I tried to keep the distance of the two rods at the top of the triangle as big as possible for stability. If the geometry of your rack doesn’t allow leaning the triangle against it, you could somehow put a distancing block between the frame and the bottom rod in the front, and in the back bend a rod all the way around the wheel to the rod on the other side.
I attached the panniers to the big rod to determine the position of the bottom rod based on the bottom hook of the panniers. On the left side, I adjusted the bottom hook of the pannier to the highest possible position, because I wanted the bottom rod to be as high as possible to leave space for a trailer arm. I made sure to keep the bottom rods parallel to the top rods and to the rack.
-
- The rods are clamped to the rack with screws and a steel bracket.
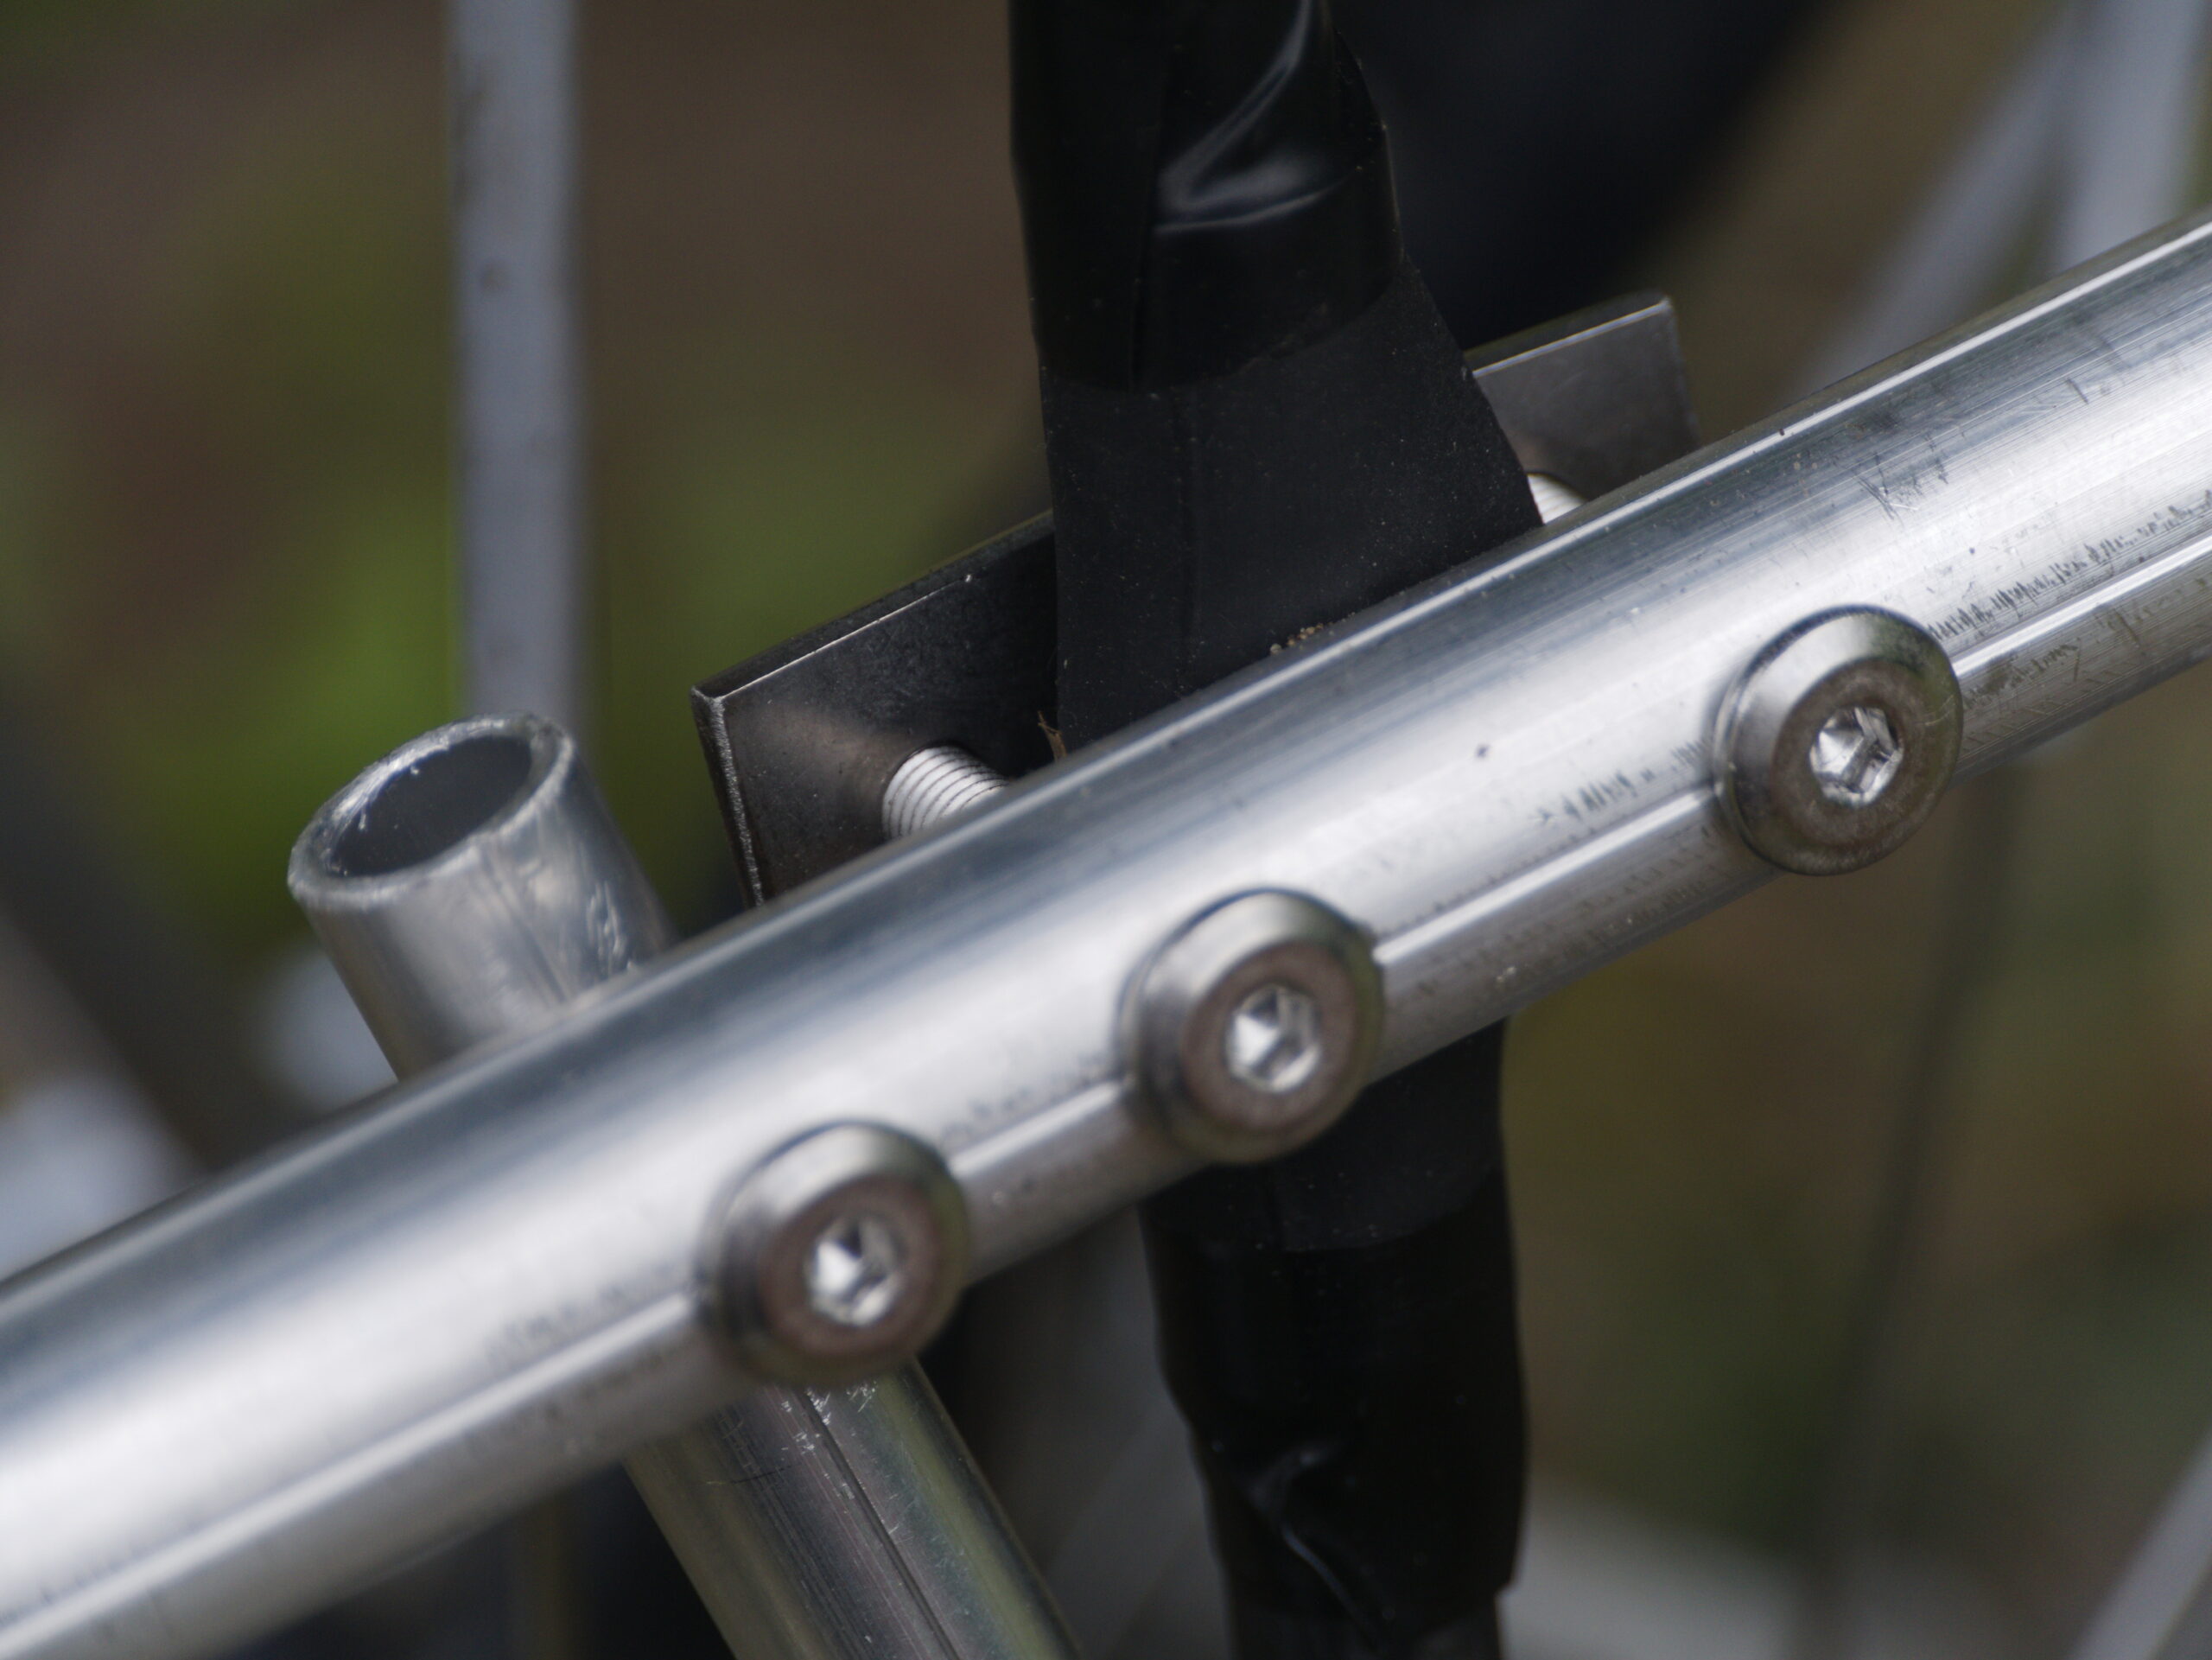
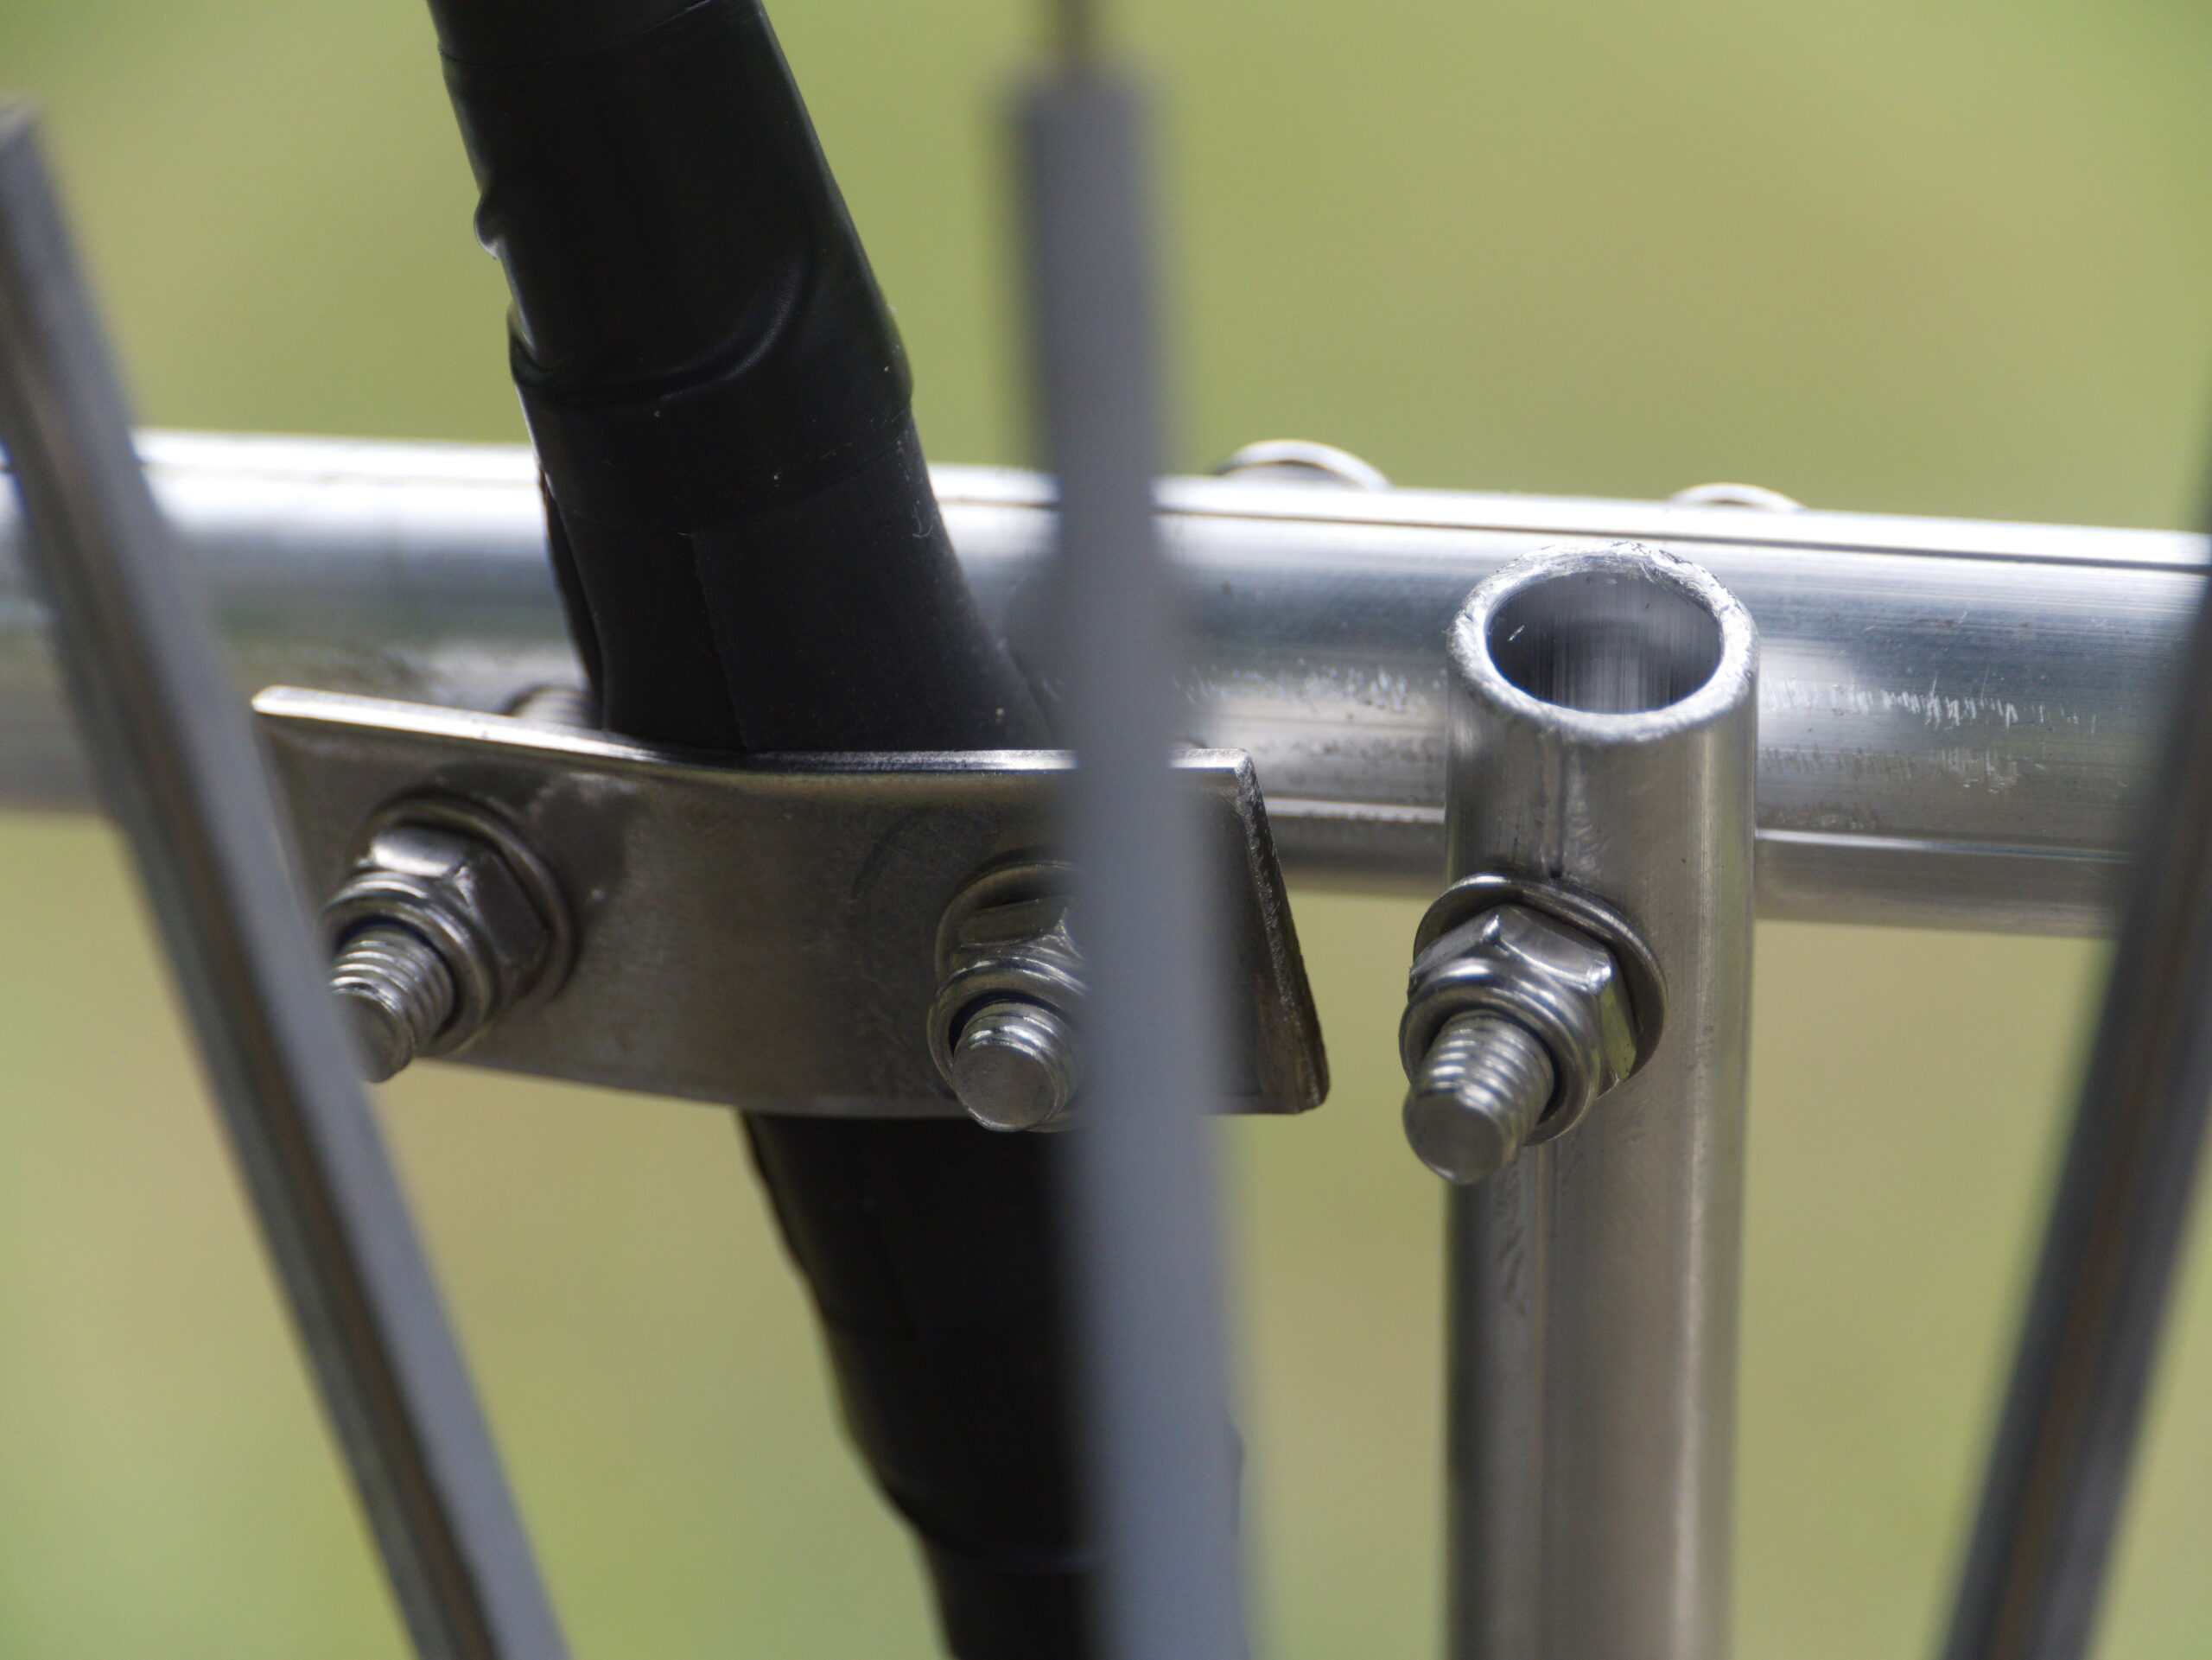
So far the frame seems to hold well and I have space to fill my panniers up to the top, and there is even some space on top of the rack under the child seat for a bit of luggage. With the panniers attached, it almost looks like it was always meant to be this way and all the thought and effort that went into building this become invisible. Now it is time to try it out in the wild. I will update this blog post with some experiences in a few weeks.